This tutorial describes how to customize Fluentd logging for a Google Kubernetes Engine cluster. You'll learn how to host your own configurable Fluentd daemonset to send logs to Cloud Logging, instead of selecting the cloud logging option when creating the Google Kubernetes Engine (GKE) cluster, which does not allow configuration of the Fluentd daemon.
Objectives
- Deploy your own Fluentd daemonset on a Google Kubernetes Engine cluster, configured to log data to Cloud Logging. We assume that you are already familiar with Kubernetes.
- Customize GKE logging to remove sensitive data from the Cloud Logging logs.
- Customize GKE logging to add node-level events to the Cloud Logging logs.
Costs
This tutorial uses billable components of Google Cloud, including:
- A three-node Google Kubernetes Engine cluster.
The Pricing Calculator estimates the cost of this environment at around $1.14 for 8 hours.
Before you begin
- Sign in to your Google Cloud account. If you're new to Google Cloud, create an account to evaluate how our products perform in real-world scenarios. New customers also get $300 in free credits to run, test, and deploy workloads.
-
In the Google Cloud console, on the project selector page, select or create a Google Cloud project.
-
Make sure that billing is enabled for your Google Cloud project.
-
Enable the Google Kubernetes Engine, Compute Engine APIs.
-
In the Google Cloud console, on the project selector page, select or create a Google Cloud project.
-
Make sure that billing is enabled for your Google Cloud project.
-
Enable the Google Kubernetes Engine, Compute Engine APIs.
Initializing common variables
You must define several variables that control where elements of the infrastructure are deployed.
Using a text editor, edit the following script, substituting your project ID for
[YOUR_PROJECT_ID]. The script sets the region tous-east-1. If you make any changes to the script, make sure that the zone values reference the region you specify.export region=us-east1 export zone=${region}-b export project_id=[YOUR_PROJECT_ID]Go to Cloud Shell.
Copy the script into your Cloud Shell window and run it.
Run the following commands to set the default zone and project ID so you don't have to specify these values in every subsequent command:
gcloud config set compute/zone ${zone}
gcloud config set project ${project_id}
Creating the GKE cluster
In Cloud Shell, clone the sample repository:
git clone http://github.com/GoogleCloudPlatform/kubernetes-engine-customize-fluentd
The sample repository includes the Kubernetes manifests for the Fluentd daemonset and a test logging program that you deploy later in this tutorial.
Change your working directory to the cloned repository:
cd kubernetes-engine-customize-fluentd
Create the GKE cluster with system logging and monitoring only:
gcloud container clusters create gke-with-custom-fluentd \
   --zone us-east1-b \
   --logging=SYSTEM \
   --tags=gke-cluster-with-customized-fluentd \
   --scopes=logging-write,storage-rw
Deploying the test logger application
By default, the sample application that you deploy
continuously emits random logging statements. The Docker container is built from
the source code in the test-logger subdirectory.
In Cloud Shell, build the
test-loggercontainer image:docker build -t test-logger test-logger
Tag the container before pushing to the registry:
docker tag test-logger gcr.io/${project_id}/test-loggerPush the container image:
docker push gcr.io/${project_id}/test-loggerUpdate the deployment file:
envsubst < kubernetes/test-logger.yaml > kubernetes/test-logger-deploy.yaml
Deploy the
test-loggerapplication to the GKE cluster:kubectl apply -f kubernetes/test-logger-deploy.yaml
View the status of the
test-loggerPods:kubectl get pods
Repeat this command until the output looks like the following, with all three
test-loggerPods running:
Deploying the Fluentd daemonset to your cluster
Next you configure and deploy your Fluentd daemonset.
In Cloud Shell, deploy the Fluentd configuration:
kubectl apply -f kubernetes/fluentd-configmap.yaml
Deploy the Fluentd daemonset:
kubectl apply -f kubernetes/fluentd-daemonset.yaml
Check that the Fluentd Pods have started:
kubectl get pods --namespace=kube-system
If they're running, you see output like the following:

Verify that you're seeing logs in Logging. In the console, on the left-hand side, select Logging > Logs Explorer and then select Kubernetes Container as a resource type in the Resource list.
Click Run Query.
In the Logs field explorer, select test-logger for CONTAINER_NAME:
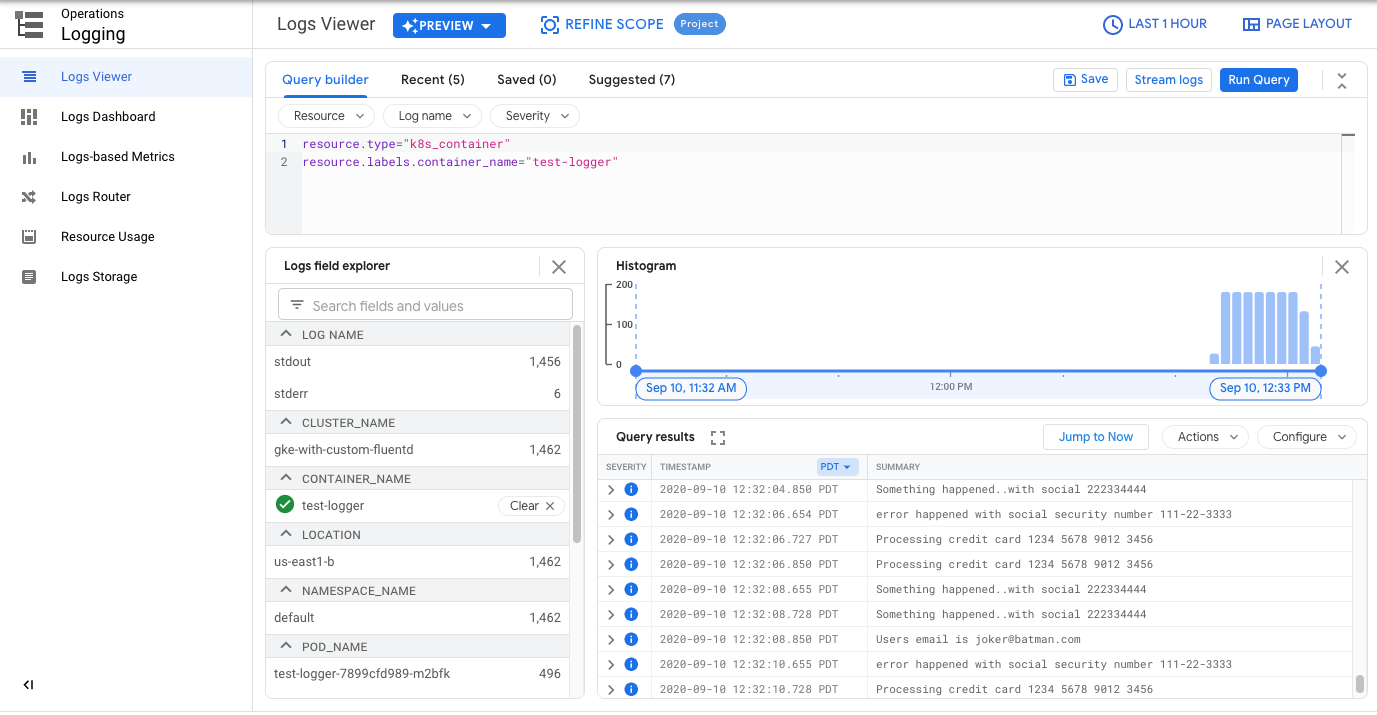
Filtering information from the logfile
The next step is to specify that Fluentd should filter certain data so that it is not logged. For this tutorial, you filter out the Social Security numbers, credit card numbers, and email addresses. To make this update, you change the daemonset to use a different ConfigMap that contains these filters. You use Kubernetes rolling updates feature and preserve the old version of the ConfigMap.
Open the
kubernetes/fluentd-configmap.yamlfile in an editor.Uncomment the lines between and not including the lines
### sample log scrubbing filtersand### end sample log scrubbing filters:Change the name of the ConfigMap from
fluentd-gcp-configtofluentd-gcp-config-filteredby editing themetadata.namefield:Save and close the file.
Updating the Fluentd daemonset to use the new configuration
Now you change kubernetes/fluentd-daemonset.yaml to mount the
ConfigMap fluentd-gcp-config-filtered instead of fluentd-gcp-config.
Open the
kubernetes/fluentd-daemonset.yamlfile in an editor.Change the name of the ConfigMap from
fluentd-gcp-configtofluentd-gcp-config-filteredby editing theconfigMap.namefield:Deploy the new version of the ConfigMap to your cluster:
kubectl apply -f kubernetes/fluentd-configmap.yaml
Roll out the new version of the daemonset:
kubectl apply -f kubernetes/fluentd-daemonset.yaml
Roll out the update and wait for it to complete:
kubectl rollout status ds/fluentd-gcp --namespace=kube-system

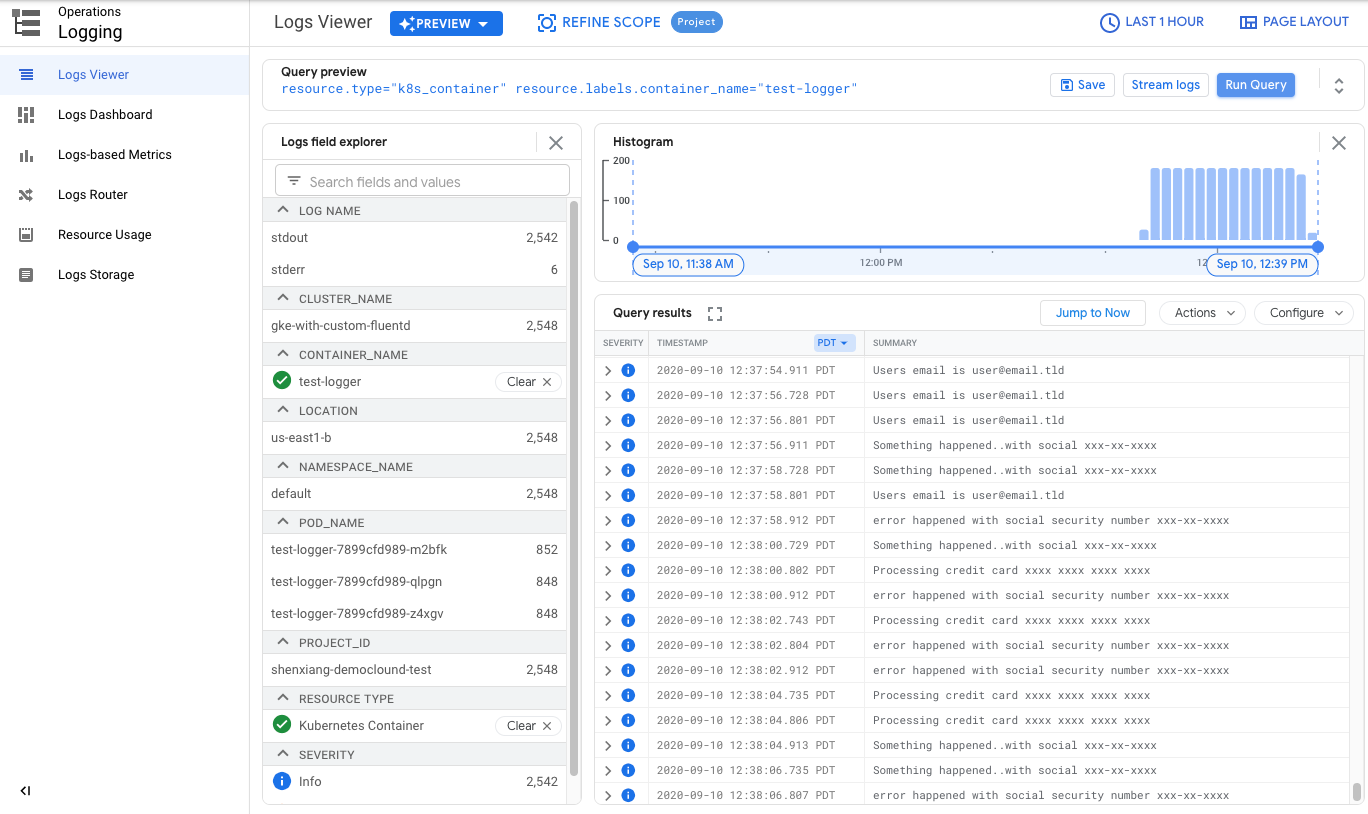
When the rollout is complete, refresh the Logging logs and make sure that the Social Security number, credit card number, and email address data has been filtered out.
Logging node-level events
If you want events that happen on your GKE nodes to show up in Logging as well, add the following lines to your ConfigMap and follow the instructions described in the last section:
<source>
  @type systemd
  filters [{ "SYSLOG_IDENTIFIER": "sshd" }]
  pos_file /var/log/journal/gcp-journald-ssh.pos
  read_from_head true
  tag sshd
</source>

<source>
  @type systemd
  filters [{ "SYSLOG_IDENTIFIER": "sudo" }]
  pos_file /var/log/journal/gcp-journald-sudo.pos
  read_from_head true
  tag sudo
</source>
Clean up
After you've finished the tutorial, you can clean up the resources you created on Google Cloud so you won't be billed for them in the future.
Deleting the project
The easiest way to eliminate billing is to delete the project that you created for the tutorial.
To delete the project:
- In the Google Cloud console, go to the Manage resources page.
- In the project list, select the project that you want to delete, and then click Delete.
- In the dialog, type the project ID, and then click Shut down to delete the project.
Deleting the GKE cluster
If you don't want to delete the whole project, run the following command to delete the GKE cluster:
gcloud container clusters delete gke-with-custom-fluentd --zone us-east1-b
What's next
- Review Fluentd documentation in more detail.
- Review Google Kubernetes Engine documentation in more detail.
- Explore reference architectures, diagrams, and best practices about Google Cloud. Take a look at our Cloud Architecture Center.