On-premises hosts can reach a Vector Search index endpoint either through the public internet or privately through a hybrid networking architecture that uses Private Service Connect (PSC) over Cloud VPN or Cloud Interconnect. Both options offer SSL/TLS encryption. However, the private option offers much better performance and is therefore recommended for critical applications.
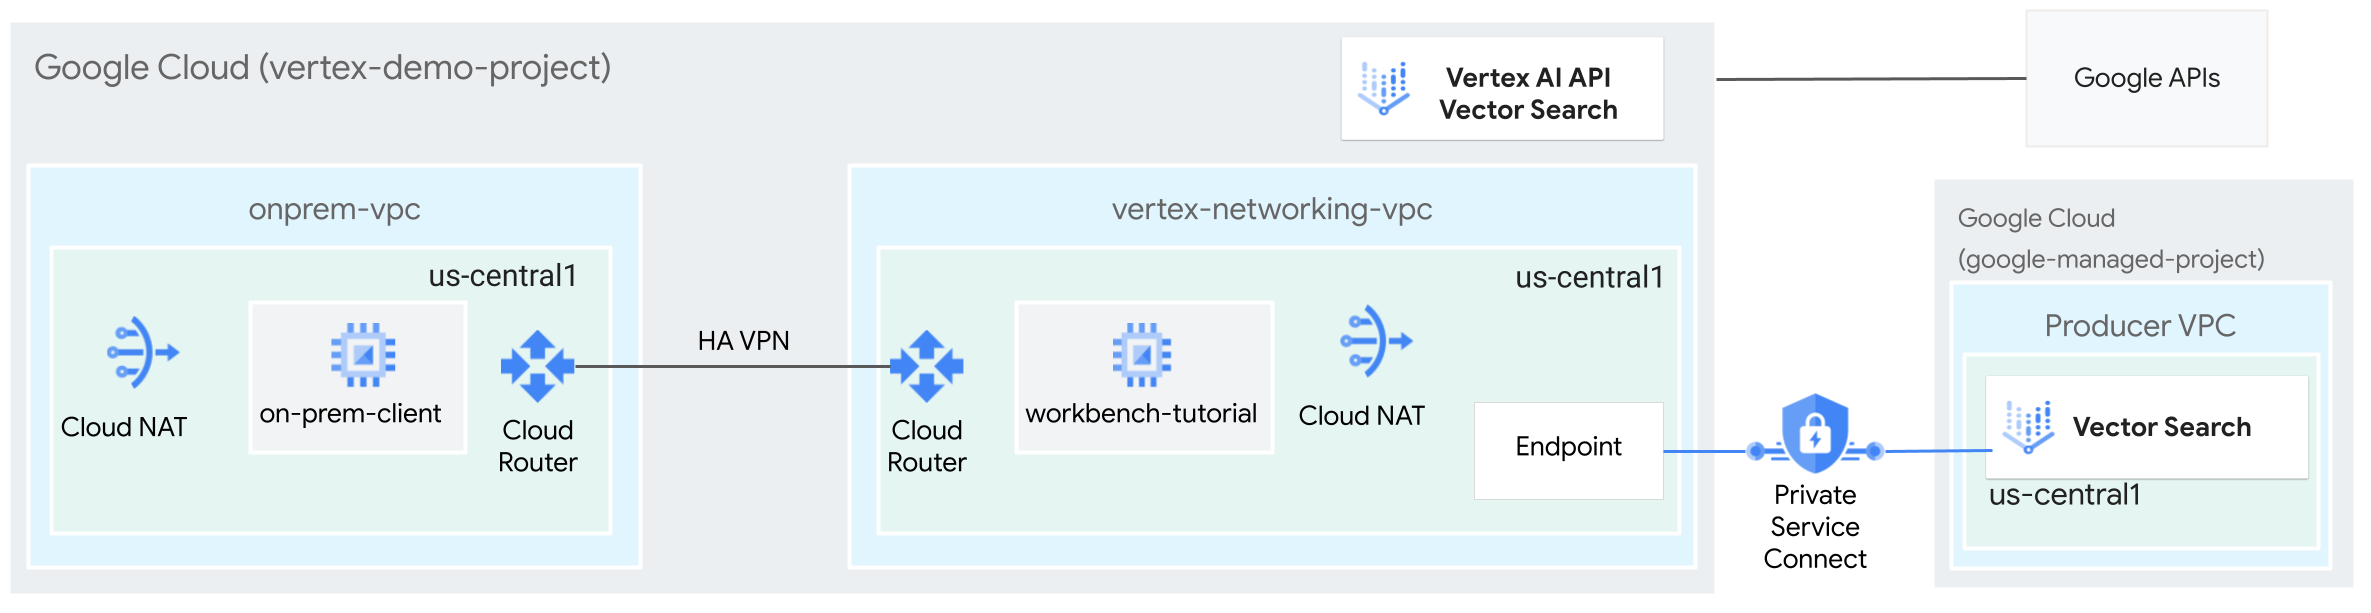
In this tutorial, you use High-Availability VPN (HA VPN) to access a Vector Search index endpoint privately, between two Virtual Private Cloud (VPC) networks that can serve as a basis for multi-cloud and on-premises private connectivity.
This tutorial is intended for enterprise network administrators, data scientists, and researchers who are familiar with Vertex AI, Virtual Private Cloud, the Google Cloud console, and the Cloud Shell. Familiarity with Vector Search is helpful but not required.
Objectives
- Create two VPC networks, as shown in the preceding
diagram:
- One (
onprem-vpc) represents an on-premises network. - The other (
vertex-networking-vpc) is for the Vector Search index endpoint.
- One (
- Deploy HA VPN gateways, Cloud VPN tunnels, and
Cloud Routers to connect
vertex-networking-vpcandonprem-vpc. - Build and deploy a Vector Search index.
- Create a Private Service Connect (PSC) endpoint to forward queries to the Vector Search index endpoint.
- Configure a Cloud Router custom route advertisement in
vertex-networking-vpcto announce routes for the Private Service Connect endpoint toonprem-vpc. - Create a Compute Engine VM instance in
onprem-vpcto represent a client application that sends requests to the Vector Search index endpoint over HA VPN.
Costs
In this document, you use the following billable components of Google Cloud:
To generate a cost estimate based on your projected usage,
use the pricing calculator.
When you finish the tasks that are described in this document, you can avoid continued billing by deleting the resources that you created. For more information, see Clean up.
Before you begin
-
In the Google Cloud console, go to the project selector page.
-
Select or create a Google Cloud project.
-
Make sure that billing is enabled for your Google Cloud project.
- Open Cloud Shell to execute the commands listed in this tutorial. Cloud Shell is an interactive shell environment for Google Cloud that lets you manage your projects and resources from your web browser.
- In the Cloud Shell, set the current project to your
Google Cloud project ID and store the same
project ID into the
projectidshell variable:projectid="PROJECT_ID" gcloud config set project ${projectid}Replace PROJECT_ID with your project ID. If necessary, you can locate your project ID in the Google Cloud console. For more information, see Find your project ID. - If you're not the project owner, ask the project owner to grant you the Project IAM Admin (roles/resourcemanager.projectIamAdmin) role. You must have this role to grant IAM roles in the next step.
-
Grant roles to your Google Account. Run the following command once for each of the following IAM roles:
    roles/aiplatform.user,
    roles/compute.instanceAdmin.v1,
    roles/compute.networkAdmin,
    roles/compute.securityAdmin,
    roles/dns.admin,
    roles/iam.serviceAccountAdmin,
    roles/iam.serviceAccountUser,
    roles/iap.admin,
    roles/iap.tunnelResourceAccessor,
    roles/notebooks.admin,
    roles/servicemanagement.quotaAdmin,
    roles/servicedirectory.editor,
    roles/storage.admin,
    roles/aiplatform.admin,
    roles/aiplatform.user,
    roles/resourcemanager.projectIamAdmin
gcloud projects add-iam-policy-binding PROJECT_ID --member="user:EMAIL_ADDRESS" --role=ROLE
- Replace
PROJECT_IDwith your project ID. - Replace
EMAIL_ADDRESSwith your email address. - Replace
ROLEwith each individual role.
- Replace
-
Enable the DNS, IAM, Compute Engine, Notebooks, and Vertex AI APIs:
gcloud services enable dns.googleapis.com
iam.googleapis.com compute.googleapis.com notebooks.googleapis.com aiplatform.googleapis.com
Create the VPC networks
In this section you create two VPC networks: one for creating a Vector Search index and deploying it to an endpoint, the other for private access to that endpoint.
Create the VPC network for the Vector Search index endpoint (vertex-networking-vpc)
Create the VPC network for the index endpoint:
gcloud compute networks create vertex-networking-vpc --project=$projectid --subnet-mode customCreate a subnet named
workbench-subnet, with a primary IPv4 range of172.16.20.0/28:gcloud compute networks subnets create workbench-subnet \ --project=$projectid --range=172.16.20.0/28 \ --network=vertex-networking-vpc \ --region=us-central1 \ --enable-private-ip-google-accessCreate a subnet named
consumer-endpoint-subnet, with a primary IPv4 range of172.16.30.0/28:gcloud compute networks subnets create consumer-endpoint-subnet \ --project=$projectid \ --range=172.16.30.0/28 \ --network=vertex-networking-vpc \ --region=us-central1 \ --enable-private-ip-google-access
Create the VPC network for private access to the endpoint (onprem-vpc)
Create the VPC network to simulate the on-premises network (
onprem-vpc):gcloud compute networks create onprem-vpc \ --subnet-mode customIn the
onprem-vpcnetwork, create a subnet namedonprem-vpc-subnet1, with a primary IPv4 range of172.16.10.0/29:gcloud compute networks subnets create onprem-vpc-subnet1 \ --network onprem-vpc \ --range 172.16.10.0/29 \ --region us-central1
Verify that the VPC networks are correctly configured
In the Google Cloud console, go to the Networks in current project tab in the VPC networks page.
In the list of VPC networks, verify that the two networks have been created:
vertex-networking-vpcandonprem-vpc.Click the Subnets in current project tab.
In the list of VPC subnets, verify that the
workbench-subnet,consumer-endpoint-subnet, andonprem-vpc-subnet1subnets have been created.
Create the on-prem-client VM instance
In this section you create a VM instance to represent a client application that sends requests to the Vector Search index endpoint over HA VPN.
In the Cloud Shell, create the
on-prem-clientVM instance:gcloud compute instances create on-prem-client \ --zone=us-central1-a \ --image-family=debian-11 \ --image-project=debian-cloud \ --subnet=onprem-vpc-subnet1 \ --scopes=http://www.googleapis.com/auth/cloud-platform \ --no-address \ --shielded-secure-boot \ --metadata startup-script="#! /bin/bash sudo apt-get update sudo apt-get install tcpdump dnsutils -y"
Configure hybrid connectivity
In this section you create two HA VPN
gateways that are connected to each other. One resides in the
vertex-networking-vpc VPC network. The other resides in the
onprem-vpc VPC network.
Each gateway contains a
Cloud Router and a pair of VPN tunnels.
Create the HA VPN gateways
In the Cloud Shell, create the HA VPN gateway for the
vertex-networking-vpcVPC network:gcloud compute vpn-gateways create vertex-networking-vpn-gw1 \ --network vertex-networking-vpc \ --region us-central1Create the HA VPN gateway for the
onprem-vpcVPC network:gcloud compute vpn-gateways create onprem-vpn-gw1 \ --network onprem-vpc \ --region us-central1In the Google Cloud console, go to the Cloud VPN Gateways tab in the VPN page.
Verify that the two gateways (
vertex-networking-vpn-gw1andonprem-vpn-gw1) have been created and that each one has two interface IP addresses.
Create Cloud Routers and Cloud NAT gateways
In each of the two VPC networks, you create two Cloud Routers: one general and one regional. In each of the regional Cloud Routers, you create a Cloud NAT gateway. Cloud NAT gateways provide outgoing connectivity for Compute Engine virtual machine (VM) instances that don't have external IP addresses.
In the Cloud Shell, create a Cloud Router for the
vertex-networking-vpcVPC network:gcloud compute routers create vertex-networking-vpc-router1 \ --region us-central1\ --network vertex-networking-vpc \ --asn 65001Create a Cloud Router for the
onprem-vpcVPC network:gcloud compute routers create onprem-vpc-router1 \ --region us-central1\ --network onprem-vpc\ --asn 65002Create a regional Cloud Router for the
vertex-networking-vpcVPC network:gcloud compute routers create cloud-router-us-central1-vertex-nat \ --network vertex-networking-vpc \ --region us-central1Configure a Cloud NAT gateway on the regional Cloud Router:
gcloud compute routers nats create cloud-nat-us-central1 \
  --router=cloud-router-us-central1-vertex-nat \
  --auto-allocate-nat-external-ips \
  --nat-all-subnet-ip-ranges \
  --region us-central1
Create a regional Cloud Router for the
onprem-vpcVPC network:gcloud compute routers create cloud-router-us-central1-onprem-nat \ --network onprem-vpc \ --region us-central1Configure a Cloud NAT gateway on the regional Cloud Router:
gcloud compute routers nats create cloud-nat-us-central1-on-prem \
  --router=cloud-router-us-central1-onprem-nat \
  --auto-allocate-nat-external-ips \
  --nat-all-subnet-ip-ranges \
  --region us-central1
In the Google Cloud console, go to the Cloud Routers page.
In the Cloud Routers list, verify that the following routers have been created:
cloud-router-us-central1-onprem-natcloud-router-us-central1-vertex-natonprem-vpc-router1vertex-networking-vpc-router1
You may need to refresh the Google Cloud console browser tab to see the new values.
In the Cloud Routers list, click
cloud-router-us-central1-vertex-nat.In the Router details page, verify that the
cloud-nat-us-central1Cloud NAT gateway has been created.Click the back arrow to return to the Cloud Routers page.
In the router list, click
cloud-router-us-central1-onprem-nat.In the Router details page, verify that the
cloud-nat-us-central1-on-premCloud NAT gateway has been created.
Create VPN tunnels
In the Cloud Shell, in the
vertex-networking-vpcnetwork, create a VPN tunnel calledvertex-networking-vpc-tunnel0:gcloud compute vpn-tunnels create vertex-networking-vpc-tunnel0 \ --peer-gcp-gateway onprem-vpn-gw1 \ --region us-central1 \ --ike-version 2 \ --shared-secret [ZzTLxKL8fmRykwNDfCvEFIjmlYLhMucH] \ --router vertex-networking-vpc-router1 \ --vpn-gateway vertex-networking-vpn-gw1 \ --interface 0In the
vertex-networking-vpcnetwork, create a VPN tunnel calledvertex-networking-vpc-tunnel1:gcloud compute vpn-tunnels create vertex-networking-vpc-tunnel1 \ --peer-gcp-gateway onprem-vpn-gw1 \ --region us-central1 \ --ike-version 2 \ --shared-secret [bcyPaboPl8fSkXRmvONGJzWTrc6tRqY5] \ --router vertex-networking-vpc-router1 \ --vpn-gateway vertex-networking-vpn-gw1 \ --interface 1In the
onprem-vpcnetwork, create a VPN tunnel calledonprem-vpc-tunnel0:gcloud compute vpn-tunnels create onprem-vpc-tunnel0 \ --peer-gcp-gateway vertex-networking-vpn-gw1 \ --region us-central1\ --ike-version 2 \ --shared-secret [ZzTLxKL8fmRykwNDfCvEFIjmlYLhMucH] \ --router onprem-vpc-router1 \ --vpn-gateway onprem-vpn-gw1 \ --interface 0In the
onprem-vpcnetwork, create a VPN tunnel calledonprem-vpc-tunnel1:gcloud compute vpn-tunnels create onprem-vpc-tunnel1 \ --peer-gcp-gateway vertex-networking-vpn-gw1 \ --region us-central1\ --ike-version 2 \ --shared-secret [bcyPaboPl8fSkXRmvONGJzWTrc6tRqY5] \ --router onprem-vpc-router1 \ --vpn-gateway onprem-vpn-gw1 \ --interface 1In the Google Cloud console, go to the VPN page.
In the list of VPN tunnels, verify that the four VPN tunnels have been created.
Establish BGP sessions
Cloud Router uses Border Gateway Protocol (BGP) to exchange routes between
your VPC network (in this case, vertex-networking-vpc)
and your on-premises network (represented by onprem-vpc). On Cloud Router,
you configure an interface and a BGP peer for your on-premises router.
The interface and BGP peer configuration together form a BGP session.
In this section you create two BGP sessions for vertex-networking-vpc and
two for onprem-vpc.
Once you've configured the interfaces and BGP peers between your routers, they will automatically start exchanging routes.
Establish BGP sessions for vertex-networking-vpc
In the Cloud Shell, in the
vertex-networking-vpcnetwork, create a BGP interface forvertex-networking-vpc-tunnel0:gcloud compute routers add-interface vertex-networking-vpc-router1 \ --interface-name if-tunnel0-to-onprem \ --ip-address 169.254.0.1 \ --mask-length 30 \ --vpn-tunnel vertex-networking-vpc-tunnel0 \ --region us-central1In the
vertex-networking-vpcnetwork, create a BGP peer forbgp-onprem-tunnel0:gcloud compute routers add-bgp-peer vertex-networking-vpc-router1 \ --peer-name bgp-onprem-tunnel0 \ --interface if-tunnel0-to-onprem \ --peer-ip-address 169.254.0.2 \ --peer-asn 65002 \ --region us-central1In the
vertex-networking-vpcnetwork, create a BGP interface forvertex-networking-vpc-tunnel1:gcloud compute routers add-interface vertex-networking-vpc-router1 \ --interface-name if-tunnel1-to-onprem \ --ip-address 169.254.1.1 \ --mask-length 30 \ --vpn-tunnel vertex-networking-vpc-tunnel1 \ --region us-central1In the
vertex-networking-vpcnetwork, create a BGP peer forbgp-onprem-tunnel1:gcloud compute routers add-bgp-peer vertex-networking-vpc-router1 \ --peer-name bgp-onprem-tunnel1 \ --interface if-tunnel1-to-onprem \ --peer-ip-address 169.254.1.2 \ --peer-asn 65002 \ --region us-central1
Establish BGP sessions for onprem-vpc
In the
onprem-vpcnetwork, create a BGP interface foronprem-vpc-tunnel0:gcloud compute routers add-interface onprem-vpc-router1 \ --interface-name if-tunnel0-to-vertex-networking-vpc \ --ip-address 169.254.0.2 \ --mask-length 30 \ --vpn-tunnel onprem-vpc-tunnel0 \ --region us-central1In the
onprem-vpcnetwork, create a BGP peer forbgp-vertex-networking-vpc-tunnel0:gcloud compute routers add-bgp-peer onprem-vpc-router1 \ --peer-name bgp-vertex-networking-vpc-tunnel0 \ --interface if-tunnel0-to-vertex-networking-vpc \ --peer-ip-address 169.254.0.1 \ --peer-asn 65001 \ --region us-central1In the
onprem-vpcnetwork, create a BGP interface foronprem-vpc-tunnel1:gcloud compute routers add-interface onprem-vpc-router1 \ --interface-name if-tunnel1-to-vertex-networking-vpc \ --ip-address 169.254.1.2 \ --mask-length 30 \ --vpn-tunnel onprem-vpc-tunnel1 \ --region us-central1In the
onprem-vpcnetwork, create a BGP peer forbgp-vertex-networking-vpc-tunnel1:gcloud compute routers add-bgp-peer onprem-vpc-router1 \ --peer-name bgp-vertex-networking-vpc-tunnel1 \ --interface if-tunnel1-to-vertex-networking-vpc \ --peer-ip-address 169.254.1.1 \ --peer-asn 65001 \ --region us-central1
Validate BGP session creation
In the Google Cloud console, go to the VPN page.
In the list of VPN tunnels, verify that the value in the BGP session status column for each of the tunnels has changed from Configure BGP session to BGP established. You may need to refresh the Google Cloud console browser tab to see the new values.
Validate the vertex-networking-vpc learned routes
In the Google Cloud console, go to the VPC networks page.
In the list of VPC networks, click
vertex-networking-vpc.Click the Routes tab.
Select us-central1 (Iowa) in the Region list and click View.
In the Destination IP range column, verify that the
onprem-vpc-subnet1subnet's IP range (172.16.10.0/29) appears twice.
Validate the on-prem-vpc learned routes
Click the back arrow to return to the VPC networks page.
In the list of VPC networks, click
on-prem-vpc.Click the Routes tab.
Select us-central1 (Iowa) in the Region list and click View.
In the Destination IP range column, verify that the
workbench-subnetsubnet's IP range (172.16.20.0/28) and theconsumer-endpoint-subnetsubnet's IP range (172.16.30.0/28) each appear twice.
Create a Vertex AI Workbench instance
In this section you create a user-managed service account, and then you create a Vertex AI Workbench instance that uses your service account for accessing Google Cloud services and APIs.
Create a service account
In this tutorial, you create a user-managed service account following Compute Engine and IAM best practices.
In the Cloud Shell, create a service account named
workbench-sa:gcloud iam service-accounts create workbench-sa \ --display-name="workbench-sa"Assign the Vertex AI User (
roles/aiplatform.user) IAM role to the service account:gcloud projects add-iam-policy-binding $projectid \ --member="serviceAccount:workbench-sa@$projectid.iam.gserviceaccount.com" \ --role="roles/aiplatform.user"Assign the Storage Admin (
roles/storage.admin) IAM role to the service account:gcloud projects add-iam-policy-binding $projectid \ --member="serviceAccount:workbench-sa@$projectid.iam.gserviceaccount.com" \ --role="roles/storage.admin"Assign the Service Usage Admin (
roles/serviceusage.serviceUsageAdmin) IAM role to the service account:gcloud projects add-iam-policy-binding $projectid \ --member="serviceAccount:workbench-sa@$projectid.iam.gserviceaccount.com" \ --role="roles/serviceusage.serviceUsageAdmin"
Create the Vertex AI Workbench instance
Create a Vertex AI Workbench instance,
specifying the workbench-sa service account:
gcloud workbench instances create workbench-tutorial \
  --vm-image-project=deeplearning-platform-release \
  --vm-image-family=common-cpu-notebooks \
  --machine-type=n1-standard-4 \
  --location=us-central1-a \
  --subnet-region=us-central1 \
  --shielded-secure-boot=SHIELDED_SECURE_BOOT \
  --subnet=workbench-subnet \
  --disable-public-ip \
  --service-account-email=workbench-sa@$projectid.iam.gserviceaccount.com
Create and deploy a Vector Search index
Prepare your environment
In the Google Cloud console, go to the Instances tab in the Vertex AI Workbench page.
Next to your Vertex AI Workbench instance's name (
workbench-tutorial), click Open JupyterLab.Your Vertex AI Workbench instance opens JupyterLab.
Select File > New > Notebook.
From the Select Kernel menu, select Python 3 (Local) and click Select.
When your new notebook opens, there is a default code cell where you can enter code. It looks like
[ ]:followed by a text field. The text field is where you paste your code.To install the Vertex AI SDK for Python, paste the following code into the cell and click Run the selected cells and advance:
!pip install --upgrade --user google-cloud-aiplatform google-cloud-storageIn this step and each of the following ones, add a new code cell (if necessary) by clicking Insert a cell below, paste the code into the cell, and then click Run the selected cells and advance.
To use the newly installed packages in this Jupyter runtime, you need to restart the runtime:
# Restart kernel after installs so that your environment can access the new packages
import IPython

app = IPython.Application.instance()
app.kernel.do_shutdown(True)
Set the following environment variables, replacing PROJECT_ID with your project ID.
# set project ID and location
PROJECT_ID = "PROJECT_ID"
LOCATION = "us-central1"

# generate a unique id for this session
from datetime import datetime
UID = datetime.now().strftime("%m%d%H%M")
Enable APIs
In your Jupyterlab notebook, run the following command to enable APIs for Compute Engine, Vertex AI, and Cloud Storage in the notebook:
! gcloud services enable compute.googleapis.com aiplatform.googleapis.com storage.googleapis.com \
  --project {PROJECT_ID}
Prepare the sample data in a Cloud Storage bucket
In this tutorial, we use the same TheLook dataset that's used in the Vector Search quickstart. See the quickstart documentation page for more information about this dataset.
In this section you create a Cloud Storage bucket and place the dataset's embedding file in it. In a later step, you use this file to build an index.
In your Jupyterlab notebook, create a Cloud Storage bucket:
BUCKET_URI = f"gs://{PROJECT_ID}-vs-quickstart-{UID}"
! gsutil mb -l $LOCATION -p $PROJECT_ID $BUCKET_URI
Copy the example file to your Cloud Storage bucket.
! gsutil cp "gs://github-repo/data/vs-quickstart/product-embs.json" $BUCKET_URITo use Vector Search to run queries, you also need to copy the embedding file to a local directory:
! gsutil cp "gs://github-repo/data/vs-quickstart/product-embs.json" . # for query tests
Create the Vector Search index
In your Jupyterlab notebook, load the embeddings to Vector Search:
# init the aiplatform package
from google.cloud import aiplatform
aiplatform.init(project=PROJECT_ID, location=LOCATION)
Create a MatchingEngineIndex with its
create_tree_ah_indexfunction (Matching Engine is the previous name of Vector Search):# create Index my_index = aiplatform.MatchingEngineIndex.create_tree_ah_index( display_name = f"vs-quickstart-index-{UID}", contents_delta_uri = BUCKET_URI, dimensions = 768, approximate_neighbors_count = 10, )The
MatchingEngineIndex.create_tree_ah_index()method builds an index. In this tutorial, this task takes about 5 to 10 minutes.In the Google Cloud console, go to the Indexes tab in the Vector Search page.
Verify that there is an index whose name begins with
"vs-quickstart-index-"and contains the correct timestamp.Make a note of the index ID. You'll need this ID when you deploy the index in a later step.
Create the index endpoint
In the Cloud Shell, run the following commands, replacing PROJECT_ID with your project ID:
projectid=PROJECT_ID
gcloud config set project ${projectid}
SERVICE_PROJECT=${projectid}
REGION=us-central1
VERTEX_ENDPOINT=$REGION-aiplatform.googleapis.com
DISPLAY_NAME=vector-search
Create the index endpoint:
curl -H "Content-Type: application/json" \
  -H "Authorization: Bearer `gcloud auth print-access-token`" \
  http://$VERTEX_ENDPOINT/v1/projects/$SERVICE_PROJECT/locations/$REGION/indexEndpoints \
  -d '{displayName: "'$DISPLAY_NAME'", privateServiceConnectConfig: { enablePrivateServiceConnect: true, projectAllowlist: ["'$SERVICE_PROJECT'"] }}'
Verify that the index endpoint was created:
gcloud ai index-endpoints list --region=us-central1You should see output similar to the following example, in which the index endpoint ID is
8151506529447575552:Using endpoint [http://us-central1-aiplatform.googleapis.com/] --- createTime: '2023-10-10T23:55:20.526145Z' displayName: vector-search encryptionSpec: {} etag: AMEw9yN2qytNiwT73uwYpz_7N_b2-O8D1AuNoDb5QjFmkU4ye5Gzk2oQlMZBR1XeoQ11 name: projects/725264228516/locations/us-central1/indexEndpoints/8151506529447575552 privateServiceConnectConfig: enablePrivateServiceConnect: true projectAllowlist: - vertex-genai-400103 - vertex-genai-400103 updateTime: '2023-10-10T23:55:21.951394Z'Make a note of your index endpoint ID. You'll need this ID when you deploy your index in a later step.
Deploy the index to the endpoint
In the Cloud Shell, run the following command to deploy the index to the endpoint:
gcloud ai index-endpoints deploy-index INDEX_ENDPOINT_ID \
  --deployed-index-id=vector_one \
  --display-name=vector-search \
  --index=INDEX \
  --project=$projectid \
  --region=us-central1
Replace the following values:
- INDEX_ENDPOINT_ID: the index endpoint ID for the Private Service Connect index endpoint that you created
- INDEX: the ID for the index you're deploying
You should see output similar to the following example, in which
the index endpoint ID is 8151506529447575552:
Using endpoint [http://us-central1-aiplatform.googleapis.com/]
The deploy index operation [projects/725264228516/locations/us-central1/indexEndpoints/8151506529447575552/operations/6271807495283408896] was submitted successfully.
When you deploy the index, a Private Service Connect endpoint is generated. The deployment operation takes about 10 to 15 minutes.
Verify that the index is deployed to the index endpoint
In the Google Cloud console, go to the Index Endpoints tab in the Vector Search page.
Verify that the
vector-searchindex endpoint has a Deployed index that's also calledvector-search.If a spinning blue circle appears next to the index endpoint name, the index is still in the process of being deployed.
Get the service attachment URI for the index endpoint
After the index is fully deployed, you can obtain the service attachment URI.
In the Cloud Shell, run the following command to obtain the service attachment URI for the Private Service Connect endpoint:
gcloud ai index-endpoints list --region=us-central1 | grep -i serviceAttachment:
In the following example output, the service attachment URI is
projects/je84d1de50cd8bddb-tp/regions/us-central1/serviceAttachments/sa-gkedpm-527af280e65971fd786aaf6163e798.
Using endpoint [http://us-central1-aiplatform.googleapis.com/]
 serviceAttachment: projects/je84d1de50cd8bddb-tp/regions/us-central1/serviceAttachments/sa-gkedpm-527af280e65971fd786aaf6163e798
Make a note of the serviceAttachment URI, beginning with projects,
for example, projects/je84d1de50cd8bddb-tp/regions/us-central1/serviceAttachments/sa-gkedpm-527af280e65971fd786aaf6163e798.
You'll need it in the next step, when you create a consumer endpoint.
Create the Private Service Connect consumer endpoint
In the Cloud Shell, reserve a consumer endpoint IP address that will be used to query the Vector Search index:
gcloud compute addresses create vector-search-endpoint1 \
  --region=us-central1 \
  --subnet=consumer-endpoint-subnet
Find the reserved IP address:
gcloud compute addresses list --filter="name=vector-search-endpoint1"Create a forwarding rule to connect the endpoint to the service attachment, replacing SERVICE_ATTACHMENT_URI with your
serviceAttachmentURI.gcloud compute forwarding-rules create vector-search-endpoint1 \ --region=us-central1 \ --network=vertex-networking-vpc \ --address=vector-search-endpoint1 \ --target-service-attachment=SERVICE_ATTACHMENT_URIFollowing is a usage example for this command:
gcloud compute forwarding-rules create vector-search-endpoint1 \
  --region=us-central1 \
  --network=vertex-networking-vpc \
  --address=vector-search-endpoint1 \
  --target-service-attachment=projects/je84d1de50cd8bddb-tp/regions/us-central1/serviceAttachments/sa-gkedpm-527af280e65971fd786aaf6163e798
In the Google Cloud console, go to the Connected endpoints tab in the Private Service Connect page.
Validate that the consumer endpoint status is
Accepted.Make a note of the IP address of the Private Service Connect consumer endpoint. In a later step, you'll use this endpoint to establish communication with the deployed Vector Search index.
Query the deployed index
Now that you have established a Private Service Connect consumer
endpoint that's connected to your Vector Search index endpoint,
you can query your deployed index by sending the queries from the
on-prem-client VM instance to the consumer endpoint.
To allow Identity-Aware Proxy (IAP) to connect to your VM instances, you create a firewall rule that:
- Applies to all VM instances that you want to make accessible through IAP.
- Allows TCP traffic through port 22 from the IP range
35.235.240.0/20. This range contains all IP addresses that IAP uses for TCP forwarding.
After you create the firewall, you install the gRPC client. In a later
step, you'll use the gRPC client to send queries from the
on-prem-client VM instance.
Create the firewall rule and install gRPC
In the Cloud Shell, run the following commands, replacing PROJECT_ID with your project ID:
projectid=PROJECT_ID
gcloud config set project ${projectid}
Create an IAP firewall rule named
ssh-iap-vpc:gcloud compute firewall-rules create ssh-iap-vpc \ --network onprem-vpc \ --allow tcp:22 \ --source-ranges=35.235.240.0/20Log into the
on-prem-clientVM instance:gcloud compute ssh on-prem-client \ --project=$projectid \ --zone=us-central1-a \ --tunnel-through-iapIn the
on-prem-clientVM instance, install thegRPCclient:sudo apt-get install git -y git clone http://github.com/grpc/grpc.git sudo apt-get install build-essential autoconf libtool pkg-config -y sudo apt-get install cmake -y cd grpc/ git submodule update --init mkdir -p cmake/build cd cmake/build cmake -DgRPC_BUILD_TESTS=ON ../.. make grpc_cliThe installation takes about 30 minutes.
Get an ID for an existing index item
In the Google Cloud console, go to the Instances tab in the Vertex AI Workbench page.
Next to your Vertex AI Workbench instance's name, click Open JupyterLab.
Your Vertex AI Workbench instance opens JupyterLab.
Select File > New > Terminal.
In the JupyterLab terminal (not the Cloud Shell), view the last entry in the index:
tail -1 product-embs.jsonLook for the first key-value pair in the item, which contains the item's ID number, as in the following example:
"id":"27452"Make a note of this ID number. You'll use it in the next section.
Perform a Vector Search query
In the on-prem-client VM instance, query your deployed index:
./grpc_cli call CONSUMER_ENDPOINT_IP:10000 google.cloud.aiplatform.container.v1.MatchService.Match "deployed_index_id:'"vector_one"',embedding_id: '"ITEM_ID"'"
Replace the following values:
- CONSUMER_ENDPOINT_IP: IP address of the Private Service Connect consumer endpoint that you created in the previous section
- ITEM_ID: the item ID number that you saved in the previous section
The output should look like the following example:
   user@on-prem-client:~/grpc/cmake/build$ ./grpc_cli call  172.16.30.2:10000  google.cloud.aiplatform.container.v1.MatchService.Match "deployed_index_id:'"vector_one"',embedding_id: '"20020916"'"
   connecting to 172.16.30.2:10000
   neighbor {
     id: "16136217"
     distance: 0.99999558925628662
   }
   neighbor {
     id: "2196405"
     distance: 0.82817935943603516
   }
   neighbor {
     id: "3796353"
     distance: 0.82687419652938843
   }
   neighbor {
     id: "815154"
     distance: 0.8179466724395752
   }
   neighbor {
     id: "16262338"
     distance: 0.816785454750061
   }
   neighbor {
     id: "31290454"
     distance: 0.81560027599334717
   }
   neighbor {
     id: "4012943"
     distance: 0.80958610773086548
   }
   neighbor {
     id: "39738359"
     distance: 0.8020891547203064
   }
   neighbor {
     id: "7691697"
     distance: 0.80035769939422607
   }
   neighbor {
     id: "6398888"
     distance: 0.79880392551422119
   }
   Rpc succeeded with OK status
Clean up
To avoid incurring charges to your Google Cloud account for the resources used in this tutorial, either delete the project that contains the resources, or keep the project and delete the individual resources.
To avoid incurring charges to your Google Cloud account for the resources used in this tutorial, either delete the project that contains the resources, or keep the project and delete the individual resources.
You can delete the individual resources in the Google Cloud console as follows:
Undeploy and delete the Vector Search index as follows:
In the Google Cloud console, go to the Indexes tab in the Vector Search page.
Locate the index whose name begins with
"vs-quickstart-index-"and contains the correct timestamp.Click the index name.
In the Index info page, next to the index name in the Deployed indexes list, click Actions, and then click Undeploy.
Undeploying the index takes a few minutes. If a spinning blue circle appears next to the index name, or if the index status is listed as
Undeploying, the index is still in the process of being undeployed. You may need to refresh the Google Cloud console browser tab to see that the index is no longer deployed.Click the back arrow to return to the Indexes tab.
Next to your index's name in the index list, click Actions, and then click Delete to delete the index.
Delete the index endpoint as follows:
In the Google Cloud console, go to the Index endpoints tab in the Vector Search page.
Next to your endpoint's name in the index endpoint list, click Actions, and then click Delete to delete the index endpoint.
Delete the Vertex AI Workbench instance as follows:
In the Google Cloud console, in the Vertex AI section, go to the Instances tab in the Workbench page.
Select the
workbench-tutorialVertex AI Workbench instance and click Delete.
Delete the Compute Engine VM instance as follows:
In the Google Cloud console, go to the Compute Engine page.
Select the
on-prem-clientVM instance, and click Delete.
Delete the VPN tunnels as follows:
In the Google Cloud console, go to the VPN page.
On the VPN page, click the Cloud VPN Tunnels tab.
In the list of VPN tunnels, select the four VPN tunnels you created in this tutorial and click Delete.
Delete the HA VPN gateways as follows:
On the VPN page, click the Cloud VPN Gateways tab.
In the list of VPN gateways, click
onprem-vpn-gw1.In the Cloud VPN gateway details page, click Delete VPN Gateway.
Click the back arrow if necessary to return to the list of VPN gateways, and then click
vertex-networking-vpn-gw1.In the Cloud VPN gateway details page, click Delete VPN Gateway.
Delete the Cloud Routers as follows:
Go to the Cloud Routers page.
In the list of Cloud Routers, select the four routers that you created in this tutorial.
To delete the routers, click Delete.
This will also delete the two Cloud NAT gateways that are connected to the Cloud Routers.
Delete the
vector-search-endpoint1forwarding rule for thevertex-networking-vpcVPC network as follows:Go to the Frontends tab of the Load balancing page.
In the list of forwarding rules, click
vector-search-endpoint1.In the Forwarding rule details page, click Delete.
Delete the VPC networks as follows:
Go to the VPC networks page.
In the list of VPC networks, click
onprem-vpc.In the VPC network details page, click Delete VPC Network.
Deleting each network also deletes its subnetworks, routes, and firewall rules.
Go back to the list of VPC networks, and click
vertex-networking-vpc.In the VPC network details page, click Delete VPC Network.
Delete the storage bucket as follows:
In the Google Cloud console, go to the Cloud Storage page.
Select your storage bucket, and click Delete.
Delete the
workbench-saservice account as follows:Go to the Service accounts page.
Select the
workbench-saservice account, and click Delete.
What's next
- Learn about enterprise networking options for accessing Vertex AI endpoints and services
- Learn how Private Service Connect works and why it offers significant performance benefits.
- Learn how to use VPC Service Controls to create secure perimeters to allow or deny access to Vertex AI and other Google APIs on the Vector Search index endpoint over the public internet.
- Explore reference architectures, diagrams, and best practices about Google Cloud. Take a look at our Cloud Architecture Center.