Setup an environment before you launch a Vertex AI Neural Architecture Search experiment by following the sections below.
Before you begin
- Sign in to your Google Cloud account. If you're new to Google Cloud, create an account to evaluate how our products perform in real-world scenarios. New customers also get $300 in free credits to run, test, and deploy workloads.
-
In the Google Cloud console, on the project selector page, select or create a Google Cloud project.
-
Make sure that billing is enabled for your Google Cloud project.
-
Enable the Vertex AI API.
- Install the Google Cloud CLI.
-
To initialize the gcloud CLI, run the following command:
gcloud init
-
Update and install
gcloudcomponents:gcloud components update
gcloud components install beta -
In the Google Cloud console, on the project selector page, select or create a Google Cloud project.
-
Make sure that billing is enabled for your Google Cloud project.
-
Enable the Vertex AI API.
- Install the Google Cloud CLI.
-
To initialize the gcloud CLI, run the following command:
gcloud init
-
Update and install
gcloudcomponents:gcloud components update
gcloud components install beta - To grant all Neural Architecture Search users the
Vertex AI User
role (
roles/aiplatform.user), contact your project administrator. - Install Docker.
If you're using a Linux-based operating system, such as Ubuntu or Debian, add your username to the
dockergroup so that you can run Docker without usingsudo:sudo usermod -a -G docker ${USER}You might need to restart your system after adding yourself to the
dockergroup. - Open Docker. To ensure that Docker is running, run the following Docker command,
which returns the current time and date:
docker run busybox date
- Use
gcloudas the credential helper for Docker:gcloud auth configure-docker
-
(Optional) If you want to run the container using GPU locally,
install
nvidia-docker.
Set up your Cloud Storage bucket
This section demonstrates how to create a new bucket. You can use an existing bucket, but it must be in the same region where you are running AI Platform jobs. Additionally, if it isn't part of the project you are using to run Neural Architecture Search, you must explicitly grant access to the Neural Architecture Search service accounts.
-
Specify a name for your new bucket. The name must be unique across all buckets in Cloud Storage.
BUCKET_NAME="YOUR_BUCKET_NAME"
For example, use your project name with
-vertexai-nasappended:PROJECT_ID="YOUR_PROJECT_ID" BUCKET_NAME=${PROJECT_ID}-vertexai-nas -
Check the bucket name that you created.
echo $BUCKET_NAME
-
Select a region for your bucket and set a
REGIONenvironment variable.Use the same region where you plan on running Neural Architecture Search jobs.
For example, the following code creates
REGIONand sets it tous-central1:REGION=us-central1
-
Create the new bucket:
gsutil mb -l $REGION gs://$BUCKET_NAME
Request additional device quota for the project
The tutorials use approximately five CPU machines and don't require any additional quota. After running the tutorials, run your Neural Architecture Search job.
The Neural Architecture Search job trains a batch of models
in parallel. Each trained model corresponds to a trial.
Read the section on setting the number-of-parallel-trials
to estimate the amount of CPUs and GPUs needed for a search job.
For example, if each trial uses 2 T4 GPUs and you set
number-of-parallel-trials to 20, then you need
a total quota of 40 T4 GPUs for a search job. In addition,
if each trial is using a highmem-16 CPU, then you need 16 CPU units
per trial, which is 320 CPU units for 20 parallel trials.
However we ask for a minimum of 10 parallel trial quota
(or 20 GPU quota).
The default initial quota for GPUs varies by region and GPU type
and is usually found to be 0, 6, or 12 for Tesla_T4
and 0 or 6 for Tesla_V100. The default initial quota for CPUs
varies by region and is usually found to be 20, 450, or 2,200.
Optional: if you plan to run multiple search jobs in parallel, then scale the quota requirement. Requesting a quota doesn't charge you immediately. You are charged once you run a job.
If you don't have enough quota and try to launch a job which needs more resources than your quota, then the job won't launch giving an error which looks like:
Exception: Starting job failed: {'code': 429, 'message': 'The following quota metrics exceed quota limits: aiplatform.googleapis.com/custom_model_training_cpus,aiplatform.googleapis.com/custom_model_training_nvidia_v100_gpus,aiplatform.googleapis.com/custom_model_training_pd_ssd', 'status': 'RESOURCE_EXHAUSTED', 'details': [{'@type': 'type.googleapis.com/google.rpc.DebugInfo', 'detail': '[ORIGINAL ERROR] generic::resource_exhausted: com.google.cloud.ai.platform.common.errors.AiPlatformException: code=RESOURCE_EXHAUSTED, message=The following quota metrics exceed quota limits: aiplatform.googleapis.com/custom_model_training_cpus,aiplatform.googleapis.com/custom_model_training_nvidia_v100_gpus,aiplatform.googleapis.com/custom_model_training_pd_ssd, cause=null [google.rpc.error_details_ext] { code: 8 message: "The following quota metrics exceed quota limits: aiplatform.googleapis.com/custom_model_training_cpus,aiplatform.googleapis.com/custom_model_training_nvidia_v100_gpus,aiplatform.googleapis.com/custom_model_training_pd_ssd" }'}]}
In some cases, if multiple jobs for the same project were started at the same time and the quota isn't sufficient for all of them, then one of the jobs remain in queued state and won't start training. In this case, cancel the queued job and either request more quota or wait until the previous job finishes.
You can request the additional device
quota from the Quotas page.
You can apply filters to find the desired quota to edit:
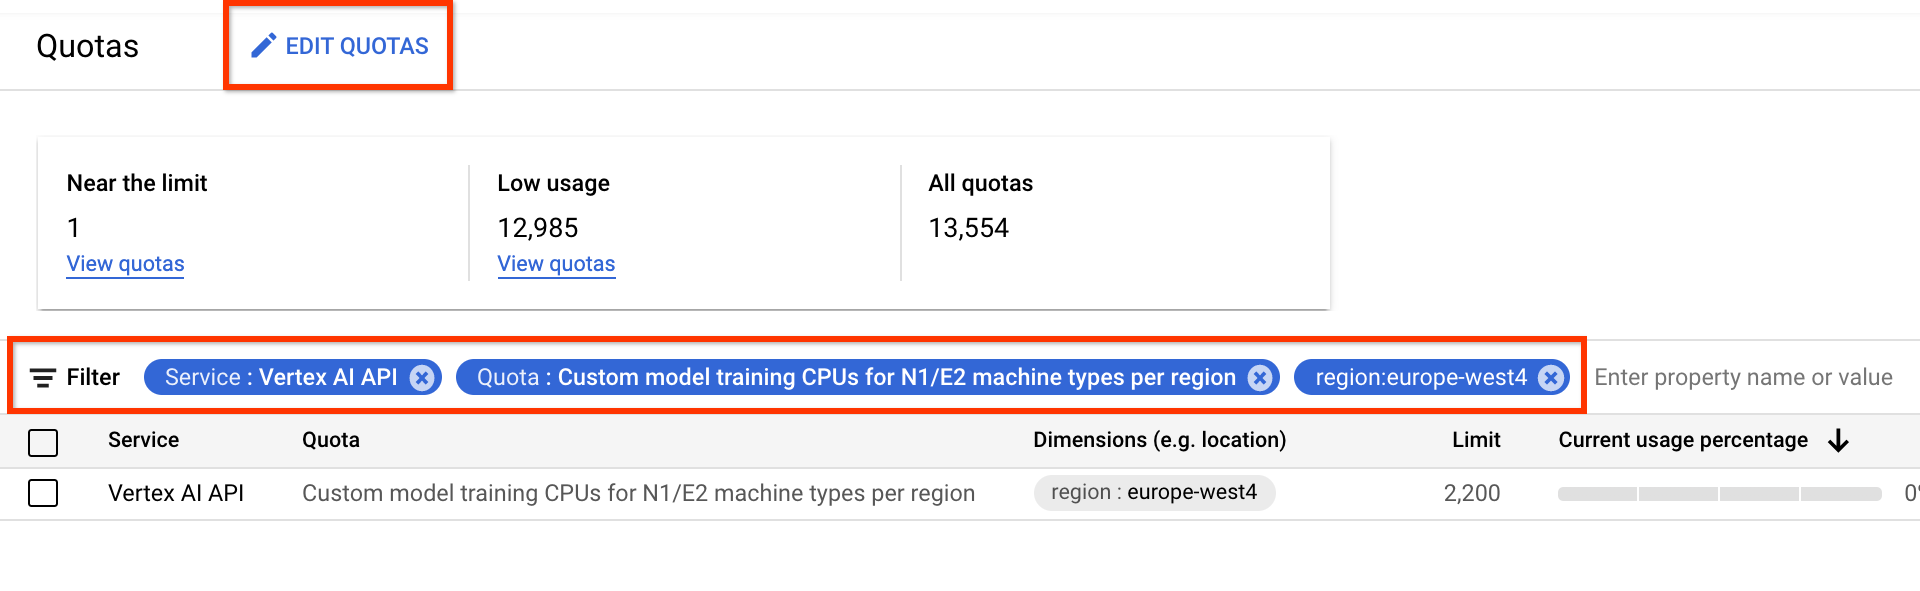
- For Service, select Vertex AI API.
- For region, select the region you want to filter on.
- For Quota, select an accelerator name whose prefix is
Custom model training.
- For V100 GPUs, the value is Custom model training Nvidia V100 GPUs per region.
- For CPUs, the value can be Custom model training CPUs for N1/E2 machine
types per region. The number for the CPU represents the unit of CPUs. If
you want 8
highmem-16CPUs, then make your quota request for 8 * 16 = 128 CPU units. Also enter the desired value for region.
Once you create a quota request, you receive a Case number and follow
up emails about the status of your request. A GPU quota approval
might take approximately two to five business days to get approved. In general,
getting a quota of approximately 20-30 GPUs should be faster to get approved
in approximately two to three days and getting approval for
approximately 100 GPUs might take five business days. A CPU quota
approval might take up to two business days to get approved.
However, if a region is experiencing a big shortage of a GPU type,
then there is no guarantee even with a small quota ask.
In this case, you might be asked to go for a different
region or a different GPU type. In general, T4 GPUs are
easier to get than V100s. T4 GPUs take more wall-clock time but
are more cost effective.
For more information, see Requesting a higher quota limit.
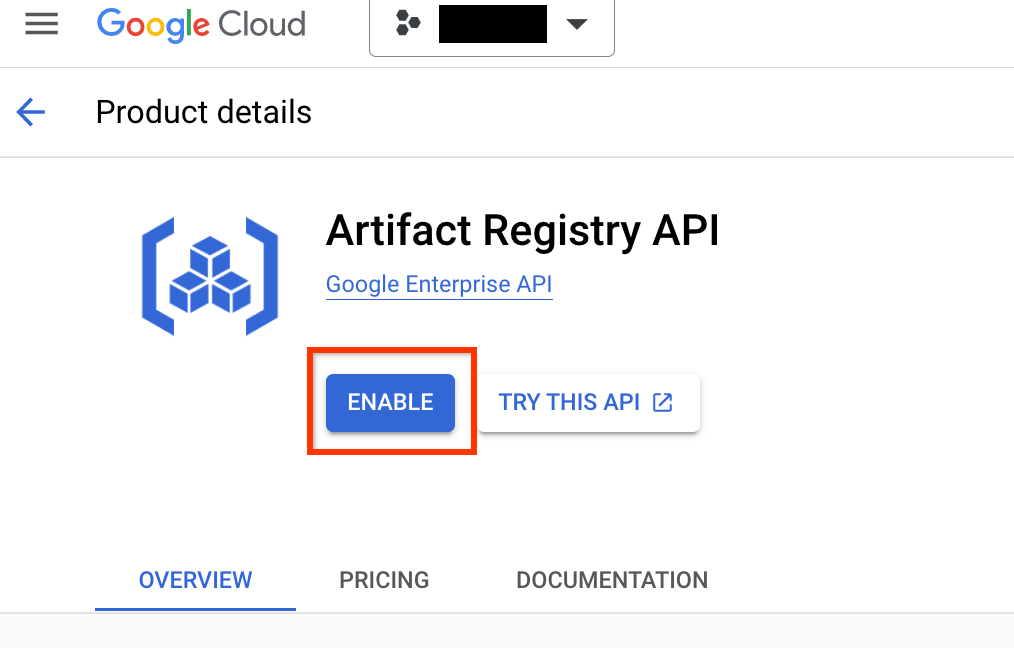
Set up artifact registry for your project
You must set up an artifact registry for your project and region where you push your docker images.
Go to the Artifact Registry page for your project. If not already enabled, enable the artifact registry API for your project first:
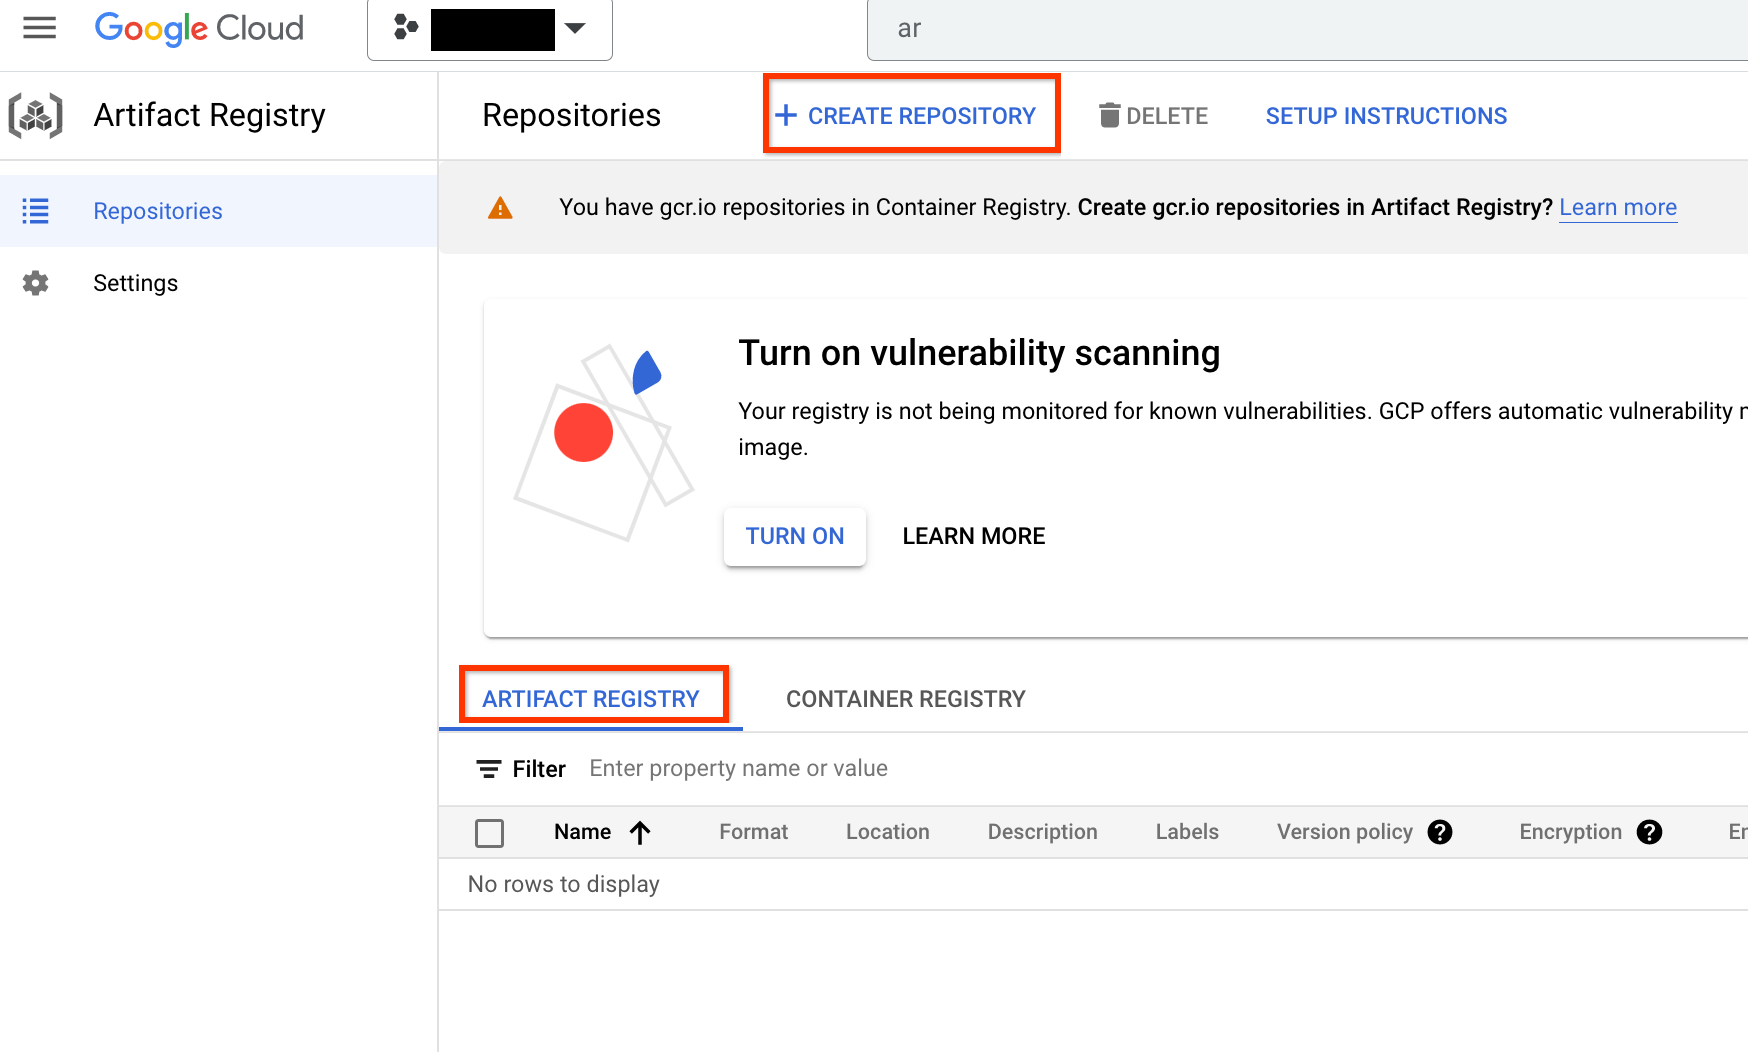
Once enabled, start creating a new repository by clicking CREATE REPOSITORY:
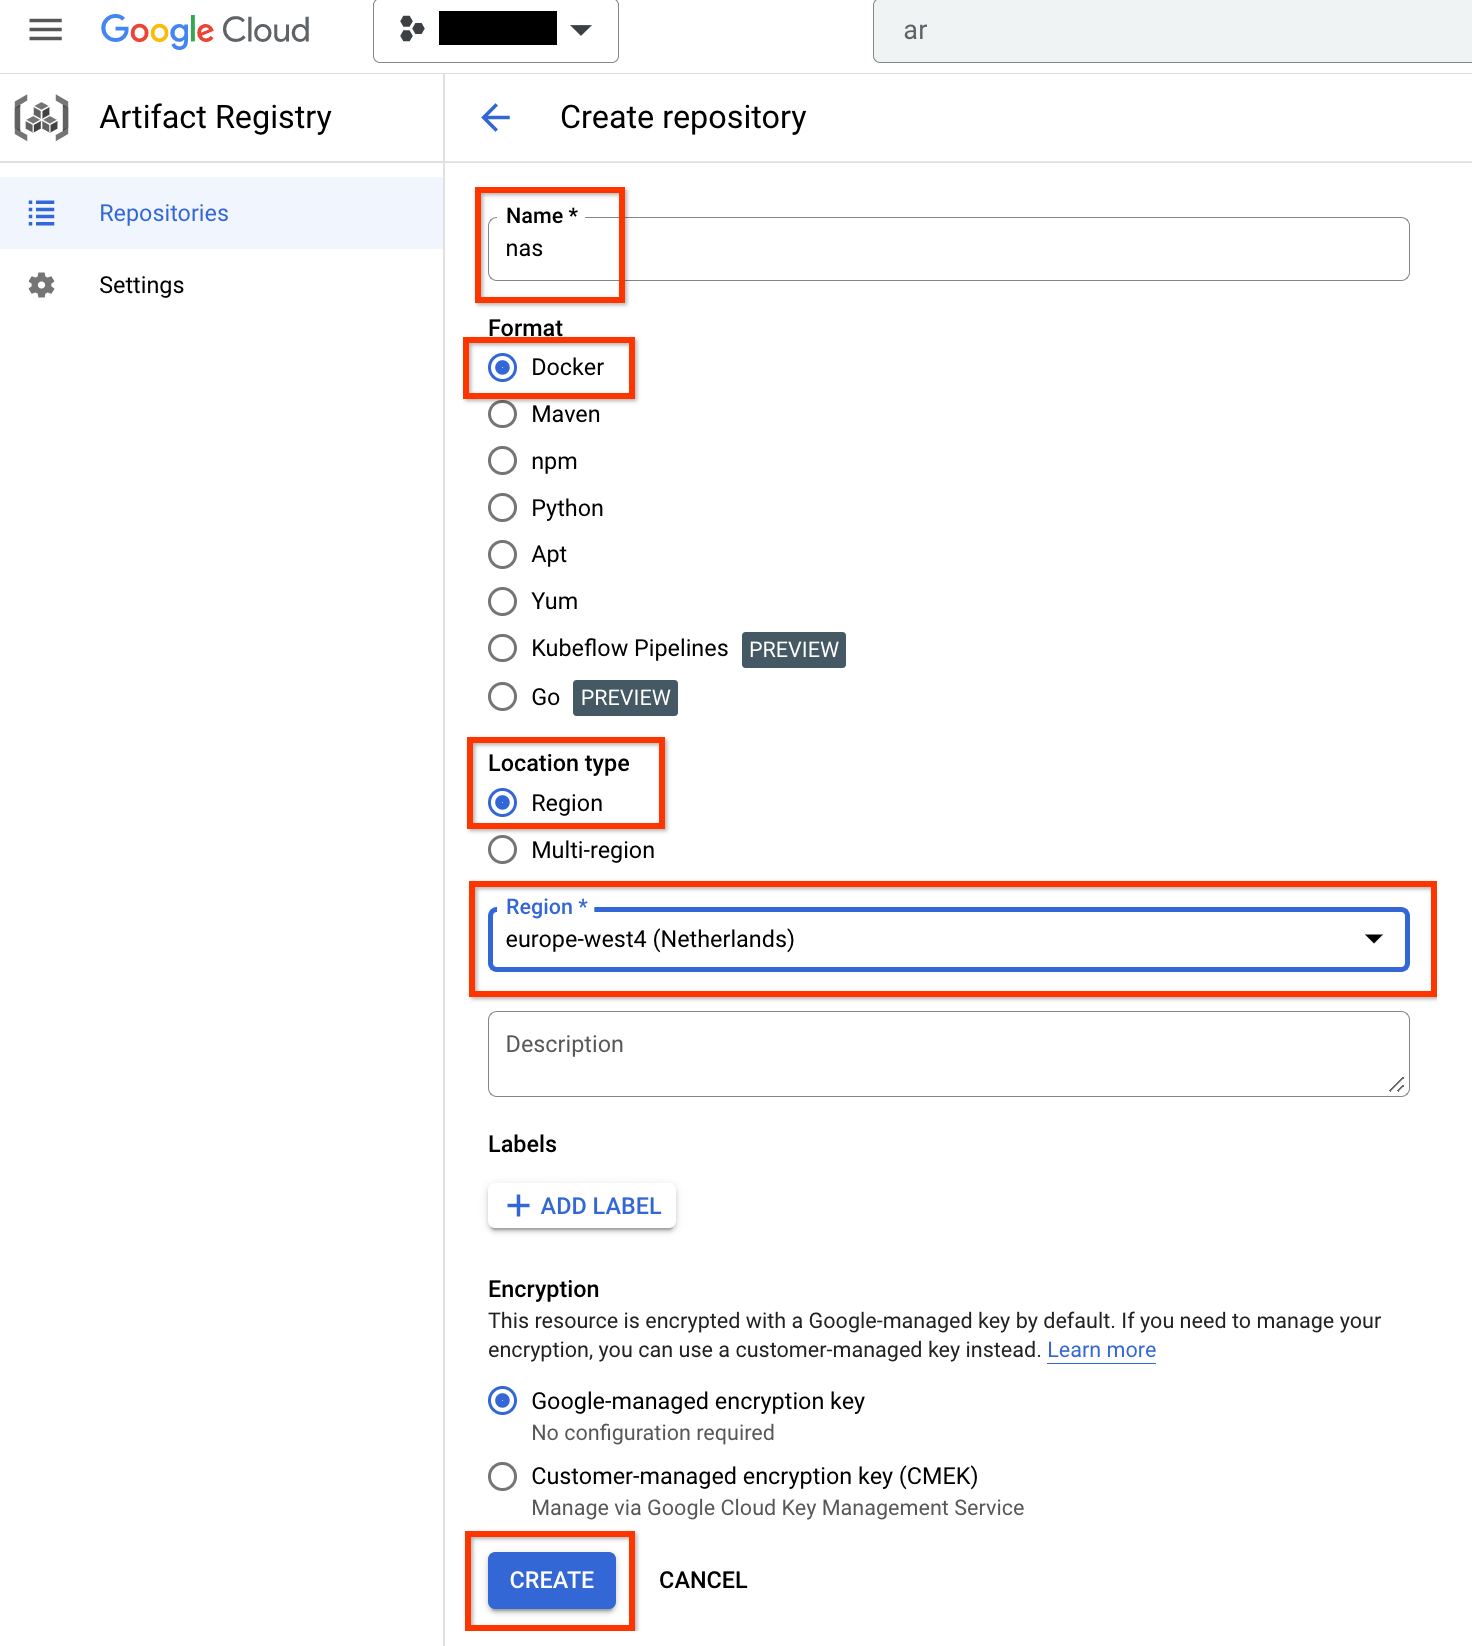
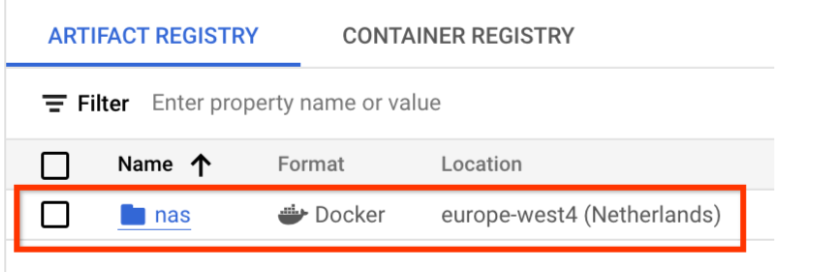
Choose Name as nas, Format as Docker, and Location type as Region. For Region, select the location where you run your jobs and then click CREATE.
This should create your desired docker repository as shown below:
You also need to set up authentication to push dockers to this repository. The local environment set up section below contains this step.
Set up your local environment
You can run these steps using the Bash shell in your local environment, or run them in a Vertex AI Workbench user-managed notebooks instance.
Set up basic environment variables:
gcloud config set project PROJECT_ID
gcloud auth login
gcloud auth application-default login
Set up docker authentication for your artifact registry:
# example: REGION=europe-west4
gcloud auth configure-docker REGION-docker.pkg.dev
(Optional) Configure a Python 3 virtual environment. Python 3 usage is recommended but not required:
sudo apt install python3-pip && \
pip3 install virtualenv && \
python3 -m venv --system-site-packages ~/./nas_venv && \
source ~/./nas_venv/bin/activate
Install additional libraries:
pip install google-cloud-storage==2.6.0
pip install pyglove==0.1.0
Set up a service account
A service account is required to be set up before running NAS jobs. You can run these steps using the Bash shell in your local environment, or run them in a Vertex AI Workbench user-managed notebooks instance.
Create a service account:
gcloud iam service-accounts create NAME \
    --description=DESCRIPTION \
    --display-name=DISPLAY_NAME
Grant the
aiplatform.userandstorage.objectAdminrole to the service account:gcloud projects add-iam-policy-binding PROJECT_ID \ --member=serviceAccount:NAME@PROJECT_ID.iam.gserviceaccount.com \ --role=roles/aiplatform.user gcloud projects add-iam-policy-binding PROJECT_ID \ --member=serviceAccount:NAME@PROJECT_ID.iam.gserviceaccount.com \ --role=roles/storage.objectAdmin
For example, the following commands create a service account named my-nas-sa
under the project my-nas-project with the aiplatform.user and storage.objectAdmin role:
  gcloud iam service-accounts create my-nas-sa \
      --description="Service account for NAS" \
      --display-name="NAS service account"
  gcloud projects add-iam-policy-binding my-nas-project \
      --member=serviceAccount:[email protected] \
      --role=roles/aiplatform.user
  gcloud projects add-iam-policy-binding my-nas-project \
      --member=serviceAccount:[email protected] \
      --role=roles/storage.objectAdmin
Download code
To start a Neural Architecture Search experiment, you need to download the sample Python code, which includes prebuilt trainers, search space definitions, and associated client libraries.
Run the following steps to download the source code.
Open a new Shell Terminal.
Run the Git clone command:
git clone http://github.com/google/vertex-ai-nas.git