This document walks you through the required steps to build a pipeline that automatically trains a custom model whenever new data is inserted into the dataset using Vertex AI Pipelines and Cloud Functions.
Objectives
The following steps cover this process:
Acquire and prepare dataset in BigQuery.
Create and upload a custom training package. When executed, it reads data from the dataset and trains the model.
Build a Vertex AI Pipeline. This pipeline executes the custom training package, uploads the model to the Vertex AI Model Registry, runs the evaluation job, and sends an email notification.
Manually run the pipeline.
Create a Cloud Function with an Eventarc trigger that runs the pipeline whenever new data is inserted into the BigQuery dataset.
Before You Begin
Setup your project and notebook.
Project setup
-
In the Google Cloud console, go to the project selector page.
-
Select or create a Google Cloud project.
-
Make sure that billing is enabled for your Google Cloud project.
Create notebook
We use a Colab Enterprise notebook to execute some of the code in this tutorial.
If you aren't the project owner, have a project owner grant you the
roles/resourcemanager.projectIamAdminandroles/aiplatform.colabEnterpriseUserIAM roles.You need to have these roles in order to use Colab Enterprise and to grant IAM roles and permissions to yourself and to service accounts.
In the Google Cloud console, go to the Colab Enterprise Notebooks page.
Colab Enterprise will ask you to enable the following required APIs if they aren't already enabled.
- Vertex AI API
- Dataform API
- Compute Engine API
In the Region menu, select the region where you want to create your notebook. If you're not sure, use us-central1 as the region.
Use the same region for all the resources in this tutorial.
Click Create a new notebook.
Your new notebook appears on the My notebooks tab. To run code in your notebook, add a code cell and click the Run cell button.
Set up development environment
In your notebook, install the following Python3 packages.
! pip3 install  google-cloud-aiplatform==1.34.0 \
                google-cloud-pipeline-components==2.6.0 \
                kfp==2.4.0 \
                scikit-learn==1.0.2 \
                mlflow==2.10.0
Set Google Cloud CLI project by running the following:
PROJECT_ID = "PROJECT_ID"

# Set the project id
! gcloud config set project {PROJECT_ID}
Replace PROJECT_ID with your project ID. If necessary, you can locate your project ID in the Google Cloud console.
Grant roles to your Google Account:
! gcloud projects add-iam-policy-binding PROJECT_ID --member="user:"EMAIL_ADDRESS"" --role=roles/bigquery.admin
! gcloud projects add-iam-policy-binding PROJECT_ID --member="user:"EMAIL_ADDRESS"" --role=roles/aiplatform.user
! gcloud projects add-iam-policy-binding PROJECT_ID --member="user:"EMAIL_ADDRESS"" --role=roles/storage.admin
! gcloud projects add-iam-policy-binding PROJECT_ID --member="user:"EMAIL_ADDRESS"" --role=roles/pubsub.editor
! gcloud projects add-iam-policy-binding PROJECT_ID --member="user:"EMAIL_ADDRESS"" --role=roles/cloudfunctions.admin
! gcloud projects add-iam-policy-binding PROJECT_ID --member="user:"EMAIL_ADDRESS"" --role=roles/logging.viewer
! gcloud projects add-iam-policy-binding PROJECT_ID --member="user:"EMAIL_ADDRESS"" --role=roles/logging.configWriter
! gcloud projects add-iam-policy-binding PROJECT_ID --member="user:"EMAIL_ADDRESS"" --role=roles/iam.serviceAccountUser
! gcloud projects add-iam-policy-binding PROJECT_ID --member="user:"EMAIL_ADDRESS"" --role=roles/eventarc.admin
! gcloud projects add-iam-policy-binding PROJECT_ID --member="user:"EMAIL_ADDRESS"" --role=roles/aiplatform.colabEnterpriseUser
! gcloud projects add-iam-policy-binding PROJECT_ID --member="user:"EMAIL_ADDRESS"" --role=roles/artifactregistry.admin
! gcloud projects add-iam-policy-binding PROJECT_ID --member="user:"EMAIL_ADDRESS"" --role=roles/serviceusage.serviceUsageAdmin
Enable the following APIs
- Artifact Registry API
- BigQuery API
- Cloud Build API
- Cloud Functions API
- Cloud Logging API
- Pub/Sub API
- Cloud Run Admin API
- Cloud Storage API
- Eventarc API
- Service Usage API
- Vertex AI API
! gcloud services enable artifactregistry.googleapis.com bigquery.googleapis.com cloudbuild.googleapis.com cloudfunctions.googleapis.com logging.googleapis.com pubsub.googleapis.com run.googleapis.com storage-component.googleapis.com eventarc.googleapis.com serviceusage.googleapis.com aiplatform.googleapis.comGrant roles to your project's service accounts:
See the names of your service accounts
! gcloud iam service-accounts listNote the name of your Compute service agent. It should be in the format of
[email protected].Grant the required roles to the service agent.
! gcloud projects add-iam-policy-binding PROJECT_ID --member="serviceAccount:"SA_ID[email protected]"" --role=roles/aiplatform.serviceAgent
! gcloud projects add-iam-policy-binding PROJECT_ID --member="serviceAccount:"SA_ID[email protected]"" --role=roles/eventarc.eventReceiver
Acquire and prepare dataset
In this tutorial, you build a model that predicts the fare for a taxi ride based on features such as ride time, location, and distance. We will use data from the public Chicago Taxi Trips dataset. This dataset includes taxi trips from 2013 to the present, reported to the City of Chicago in its role as a regulatory agency. To protect the privacy of the drivers and users of the cab at the same time and allow the aggregator to analyze the data, the Taxi ID is kept consistent for any given taxi medallion number but does not show the number, Census Tracts are suppressed in some cases, and times are rounded to the nearest 15 minutes.
For more information, check out Chicago Taxi Trips on Marketplace.
Create a BigQuery dataset
In the Google Cloud console, go to BigQuery Studio.
In the Explorer panel, locate your project, click Actions, and then click Create dataset.
On the Create dataset page:
For Dataset ID, enter
mlops. For more information, see dataset naming.For Location type, choose your multi-region. For example, choose US (multiple regions in the United States) if you are using
us-central1. After a dataset is created, the location can't be changed.Click Create dataset.
For more information, see how to create datasets.
Create and populate BigQuery table
In this section, you create the table and import one year's worth of data from the public dataset into your project's dataset.
Go to BigQuery Studio
Click Create SQL Query and run the following SQL query by clicking Run.
CREATE OR REPLACE TABLE `PROJECT_ID.mlops.chicago`
AS (
    WITH
      taxitrips AS (
      SELECT
        trip_start_timestamp,
        trip_end_timestamp,
        trip_seconds,
        trip_miles,
        payment_type,
        pickup_longitude,
        pickup_latitude,
        dropoff_longitude,
        dropoff_latitude,
        tips,
        tolls,
        fare,
        pickup_community_area,
        dropoff_community_area,
        company,
        unique_key
      FROM
        `bigquery-public-data.chicago_taxi_trips.taxi_trips`
      WHERE pickup_longitude IS NOT NULL
      AND pickup_latitude IS NOT NULL
      AND dropoff_longitude IS NOT NULL
      AND dropoff_latitude IS NOT NULL
      AND trip_miles > 0
      AND trip_seconds > 0
      AND fare > 0
      AND EXTRACT(YEAR FROM trip_start_timestamp) = 2019
    )

    SELECT
      trip_start_timestamp,
      EXTRACT(MONTH from trip_start_timestamp) as trip_month,
      EXTRACT(DAY from trip_start_timestamp) as trip_day,
      EXTRACT(DAYOFWEEK from trip_start_timestamp) as trip_day_of_week,
      EXTRACT(HOUR from trip_start_timestamp) as trip_hour,
      trip_seconds,
      trip_miles,
      payment_type,
      ST_AsText(
          ST_SnapToGrid(ST_GeogPoint(pickup_longitude, pickup_latitude), 0.1)
      ) AS pickup_grid,
      ST_AsText(
          ST_SnapToGrid(ST_GeogPoint(dropoff_longitude, dropoff_latitude), 0.1)
      ) AS dropoff_grid,
      ST_Distance(
          ST_GeogPoint(pickup_longitude, pickup_latitude),
          ST_GeogPoint(dropoff_longitude, dropoff_latitude)
      ) AS euclidean,
      CONCAT(
          ST_AsText(ST_SnapToGrid(ST_GeogPoint(pickup_longitude,
              pickup_latitude), 0.1)),
          ST_AsText(ST_SnapToGrid(ST_GeogPoint(dropoff_longitude,
              dropoff_latitude), 0.1))
      ) AS loc_cross,
      IF((tips/fare >= 0.2), 1, 0) AS tip_bin,
      tips,
      tolls,
      fare,
      pickup_longitude,
      pickup_latitude,
      dropoff_longitude,
      dropoff_latitude,
      pickup_community_area,
      dropoff_community_area,
      company,
      unique_key,
      trip_end_timestamp
    FROM
      taxitrips
    LIMIT 1000000
)
This query creates the table
<PROJECT_ID>.mlops.chicagoand populates it with data from the publicbigquery-public-data.chicago_taxi_trips.taxi_tripstable.To view the table's schema, click Go to table and then click the Schema tab.
To see the table contents, click the Preview tab.
Create and upload the custom training package
In this section, you create a Python package that contains the code that reads the dataset, splits the data into training and test sets, and trains your custom model. The package will be run as one of the tasks in your pipeline. For more information, see building a Python training application for a prebuilt container.
Create the custom training package
In your Colab notebook, create parent folders for the training application:
!mkdir -p training_package/trainerCreate an
__init__.pyfile in each folder to make it a package using the following command:! touch training_package/__init__.py ! touch training_package/trainer/__init__.pyYou can see the new files and folders in the Files folder panel.
In the Files panel, create a file called
task.pyin the training_package/trainer folder with the following contents.# Import the libraries from sklearn.model_selection import train_test_split, cross_val_score from sklearn.preprocessing import OneHotEncoder, StandardScaler from google.cloud import bigquery, bigquery_storage from sklearn.ensemble import RandomForestRegressor from sklearn.compose import ColumnTransformer from sklearn.pipeline import Pipeline from google import auth from scipy import stats import numpy as np import argparse import joblib import pickle import csv import os # add parser arguments parser = argparse.ArgumentParser() parser.add_argument('--project-id', dest='project_id', type=str, help='Project ID.') parser.add_argument('--training-dir', dest='training_dir', default=os.getenv("AIP_MODEL_DIR"), type=str, help='Dir to save the data and the trained model.') parser.add_argument('--bq-source', dest='bq_source', type=str, help='BigQuery data source for training data.') args = parser.parse_args() # data preparation code BQ_QUERY = """ with tmp_table as ( SELECT trip_seconds, trip_miles, fare, tolls, company, pickup_latitude, pickup_longitude, dropoff_latitude, dropoff_longitude, DATETIME(trip_start_timestamp, 'America/Chicago') trip_start_timestamp, DATETIME(trip_end_timestamp, 'America/Chicago') trip_end_timestamp, CASE WHEN (pickup_community_area IN (56, 64, 76)) OR (dropoff_community_area IN (56, 64, 76)) THEN 1 else 0 END is_airport, FROM `{}` WHERE dropoff_latitude IS NOT NULL and dropoff_longitude IS NOT NULL and pickup_latitude IS NOT NULL and pickup_longitude IS NOT NULL and fare > 0 and trip_miles > 0 and MOD(ABS(FARM_FINGERPRINT(unique_key)), 100) between 0 and 99 ORDER BY RAND() LIMIT 10000) SELECT *, EXTRACT(YEAR FROM trip_start_timestamp) trip_start_year, EXTRACT(MONTH FROM trip_start_timestamp) trip_start_month, EXTRACT(DAY FROM trip_start_timestamp) trip_start_day, EXTRACT(HOUR FROM trip_start_timestamp) trip_start_hour, FORMAT_DATE('%a', DATE(trip_start_timestamp)) trip_start_day_of_week FROM tmp_table """.format(args.bq_source) # Get default credentials credentials, project = auth.default() bqclient = bigquery.Client(credentials=credentials, project=args.project_id) bqstorageclient = bigquery_storage.BigQueryReadClient(credentials=credentials) df = ( bqclient.query(BQ_QUERY) .result() .to_dataframe(bqstorage_client=bqstorageclient) ) # Add 'N/A' for missing 'Company' df.fillna(value={'company':'N/A','tolls':0}, inplace=True) # Drop rows containing null data. df.dropna(how='any', axis='rows', inplace=True) # Pickup and dropoff locations distance df['abs_distance'] = (np.hypot(df['dropoff_latitude']-df['pickup_latitude'], df['dropoff_longitude']-df['pickup_longitude']))*100 # Remove extremes, outliers possible_outliers_cols = ['trip_seconds', 'trip_miles', 'fare', 'abs_distance'] df=df[(np.abs(stats.zscore(df[possible_outliers_cols].astype(float))) < 3).all(axis=1)].copy() # Reduce location accuracy df=df.round({'pickup_latitude': 3, 'pickup_longitude': 3, 'dropoff_latitude':3, 'dropoff_longitude':3}) # Drop the timestamp col X=df.drop(['trip_start_timestamp', 'trip_end_timestamp'],axis=1) # Split the data into train and test X_train, X_test = train_test_split(X, test_size=0.10, random_state=123) ## Format the data for batch predictions # select string cols string_cols = X_test.select_dtypes(include='object').columns # Add quotes around string fields X_test[string_cols] = X_test[string_cols].apply(lambda x: '\"' + x + '\"') # Add quotes around column names X_test.columns = ['\"' + col + '\"' for col in X_test.columns] # Save DataFrame to csv X_test.to_csv(os.path.join(args.training_dir,"test.csv"),index=False,quoting=csv.QUOTE_NONE, escapechar=' ') # Save test data without the target for batch predictions X_test.drop('\"fare\"',axis=1,inplace=True) X_test.to_csv(os.path.join(args.training_dir,"test_no_target.csv"),index=False,quoting=csv.QUOTE_NONE, escapechar=' ') # Separate the target column y_train=X_train.pop('fare') # Get the column indexes col_index_dict = {col: idx for idx, col in enumerate(X_train.columns)} # Create a column transformer pipeline ct_pipe = ColumnTransformer(transformers=[ ('hourly_cat', OneHotEncoder(categories=[range(0,24)], sparse = False), [col_index_dict['trip_start_hour']]), ('dow', OneHotEncoder(categories=[['Mon', 'Tue', 'Sun', 'Wed', 'Sat', 'Fri', 'Thu']], sparse = False), [col_index_dict['trip_start_day_of_week']]), ('std_scaler', StandardScaler(), [ col_index_dict['trip_start_year'], col_index_dict['abs_distance'], col_index_dict['pickup_longitude'], col_index_dict['pickup_latitude'], col_index_dict['dropoff_longitude'], col_index_dict['dropoff_latitude'], col_index_dict['trip_miles'], col_index_dict['trip_seconds']]) ]) # Add the random-forest estimator to the pipeline rfr_pipe = Pipeline([ ('ct', ct_pipe), ('forest_reg', RandomForestRegressor( n_estimators = 20, max_features = 1.0, n_jobs = -1, random_state = 3, max_depth=None, max_leaf_nodes=None, )) ]) # train the model rfr_score = cross_val_score(rfr_pipe, X_train, y_train, scoring = 'neg_mean_squared_error', cv = 5) rfr_rmse = np.sqrt(-rfr_score) print ("Crossvalidation RMSE:",rfr_rmse.mean()) final_model=rfr_pipe.fit(X_train, y_train) # Save the model pipeline with open(os.path.join(args.training_dir,"model.pkl"), 'wb') as model_file: pickle.dump(final_model, model_file)The code accomplishes the following tasks:
- Feature selection.
- Transforming the pickup and drop off data time from UTC to Chicago local time.
- Extracting the date, hour, day of the week, month, and year from the pickup datetime.
- Calculating the duration of the trip using starting and ending time.
- Identifying and marking trips that started or ended in an airport based on the community areas.
- Random Forest regression model is trained to predict the fare of the taxi trip using the scikit-learn framework.
The trained model is saved into a pickle file
model.pkl.The selected approach and feature engineering is based on data exploration and analysis on Predicting Chicago Taxi Fare.
In the Files panel, create a file called
setup.pyin the training_package folder with the following contents.from setuptools import find_packages from setuptools import setup REQUIRED_PACKAGES=["google-cloud-bigquery[pandas]","google-cloud-bigquery-storage"] setup( name='trainer', version='0.1', install_requires=REQUIRED_PACKAGES, packages=find_packages(), include_package_data=True, description='Training application package for chicago taxi trip fare prediction.' )In your notebook, run
setup.pyto create the source distribution for your training application:! cd training_package && python setup.py sdist --formats=gztar && cd ..
At the end of this section, your Files panel should contain the following files and folders under training-package.
dist
  trainer-0.1.tar.gz
trainer
  __init__.py
  task.py
trainer.egg-info
__init__.py
setup.py
Upload the custom training package to Cloud Storage
Create a Cloud Storage bucket.
REGION="REGION"
BUCKET_NAME = "BUCKET_NAME"
BUCKET_URI = f"gs://{BUCKET_NAME}"

! gsutil mb -l $REGION -p $PROJECT_ID $BUCKET_URI
Replace the following parameter values:
REGION: Choose the same region you choose when creating your colab notebook.BUCKET_NAME: The bucket name.
Upload your training package to the Cloud Storage bucket.
# Copy the training package to the bucket
! gsutil cp training_package/dist/trainer-0.1.tar.gz $BUCKET_URI/
Build your pipeline
A pipeline is a description of an MLOps workflow as a graph of steps called pipeline tasks.
In this section, you define your pipeline tasks, compile them to YAML, and register your pipeline in Artifact Registry so that it can be version controlled and run multiple times, by a single user or by multiple users.
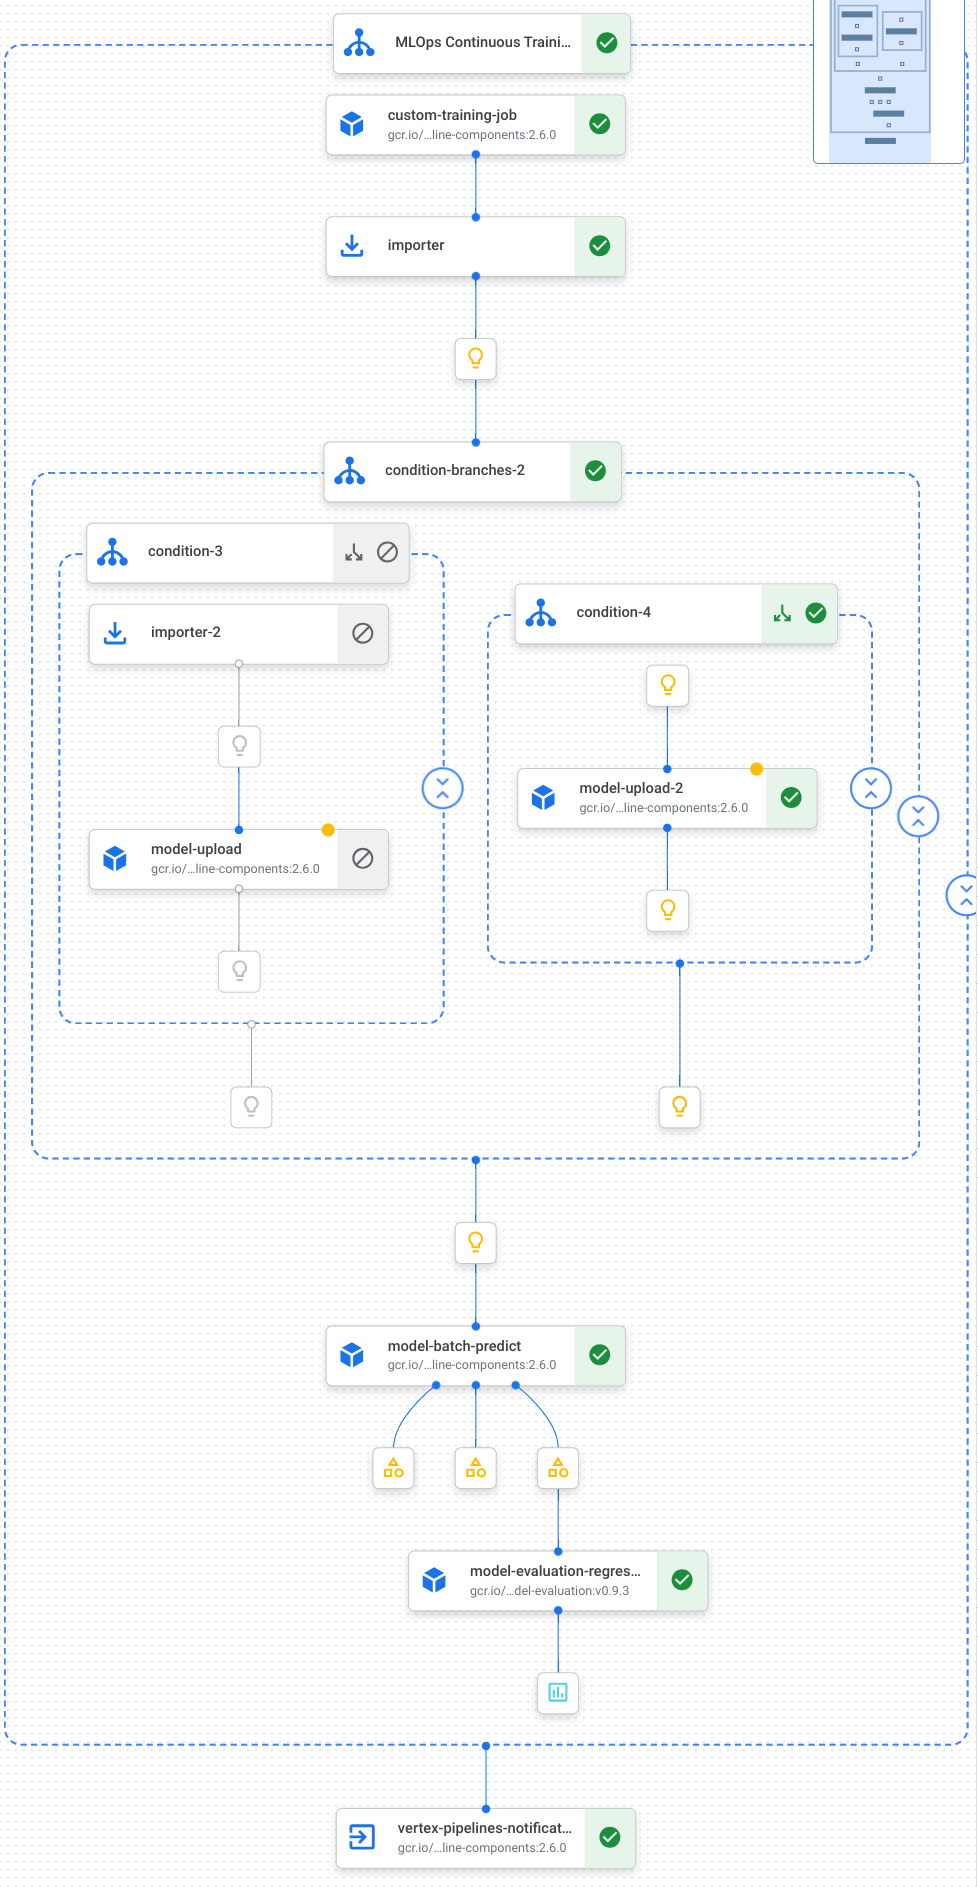
Here is a visualization of the tasks, including model training, model upload, model evaluation, and email notification, in our pipeline:
For more information, see creating pipeline templates.
Define constants and initialize clients
In your notebook, define the constants that will be used in later steps:
import os

EMAIL_RECIPIENTS = [ "NOTIFY_EMAIL" ]
PIPELINE_ROOT = "{}/pipeline_root/chicago-taxi-pipe".format(BUCKET_URI)
PIPELINE_NAME = "vertex-pipeline-datatrigger-tutorial"
WORKING_DIR = f"{PIPELINE_ROOT}/mlops-datatrigger-tutorial"
os.environ['AIP_MODEL_DIR'] = WORKING_DIR
EXPERIMENT_NAME = PIPELINE_NAME + "-experiment"
PIPELINE_FILE = PIPELINE_NAME + ".yaml"
Replace
NOTIFY_EMAILwith an email address. When the pipeline job completes, whether successfully or unsuccessfully, an email is sent to that email address.Initialize the Vertex AI SDK with the project, staging bucket, location and experiment.
from google.cloud import aiplatform

aiplatform.init(
    project=PROJECT_ID,
    staging_bucket=BUCKET_URI,
    location=REGION,
    experiment=EXPERIMENT_NAME)

aiplatform.autolog()
Define the pipeline tasks
In your notebook, define your pipeline custom_model_training_evaluation_pipeline:
from kfp import dsl
from kfp.dsl import importer
from kfp.dsl import OneOf
from google_cloud_pipeline_components.v1.custom_job import CustomTrainingJobOp
from google_cloud_pipeline_components.types import artifact_types
from google_cloud_pipeline_components.v1.model import ModelUploadOp
from google_cloud_pipeline_components.v1.batch_predict_job import ModelBatchPredictOp
from google_cloud_pipeline_components.v1.model_evaluation import ModelEvaluationRegressionOp
from google_cloud_pipeline_components.v1.vertex_notification_email import VertexNotificationEmailOp
from google_cloud_pipeline_components.v1.endpoint import ModelDeployOp
from google_cloud_pipeline_components.v1.endpoint import EndpointCreateOp
from google.cloud import aiplatform

# define the train-deploy pipeline
@dsl.pipeline(name="custom-model-training-evaluation-pipeline")
def custom_model_training_evaluation_pipeline(
    project: str,
    location: str,
    training_job_display_name: str,
    worker_pool_specs: list,
    base_output_dir: str,
    prediction_container_uri: str,
    model_display_name: str,
    batch_prediction_job_display_name: str,
    target_field_name: str,
    test_data_gcs_uri: list,
    ground_truth_gcs_source: list,
    batch_predictions_gcs_prefix: str,
    batch_predictions_input_format: str="csv",
    batch_predictions_output_format: str="jsonl",
    ground_truth_format: str="csv",
    parent_model_resource_name: str=None,
    parent_model_artifact_uri: str=None,
    existing_model: bool=False

):
    # Notification task
    notify_task = VertexNotificationEmailOp(
                    recipients= EMAIL_RECIPIENTS
                    )
    with dsl.ExitHandler(notify_task, name='MLOps Continuous Training Pipeline'):
        # Train the model
        custom_job_task = CustomTrainingJobOp(
                                    project=project,
                                    display_name=training_job_display_name,
                                    worker_pool_specs=worker_pool_specs,
                                    base_output_directory=base_output_dir,
                                    location=location
                            )

        # Import the unmanaged model
        import_unmanaged_model_task = importer(
                                        artifact_uri=base_output_dir,
                                        artifact_class=artifact_types.UnmanagedContainerModel,
                                        metadata={
                                            "containerSpec": {
                                                "imageUri": prediction_container_uri,
                                            },
                                        },
                                    ).after(custom_job_task)

        with dsl.If(existing_model == True):
            # Import the parent model to upload as a version
            import_registry_model_task = importer(
                                        artifact_uri=parent_model_artifact_uri,
                                        artifact_class=artifact_types.VertexModel,
                                        metadata={
                                            "resourceName": parent_model_resource_name
                                        },
                                    ).after(import_unmanaged_model_task)
            # Upload the model as a version
            model_version_upload_op = ModelUploadOp(
                                    project=project,
                                    location=location,
                                    display_name=model_display_name,
                                    parent_model=import_registry_model_task.outputs["artifact"],
                                    unmanaged_container_model=import_unmanaged_model_task.outputs["artifact"],
                                )

        with dsl.Else():
            # Upload the model
            model_upload_op = ModelUploadOp(
                                    project=project,
                                    location=location,
                                    display_name=model_display_name,
                                    unmanaged_container_model=import_unmanaged_model_task.outputs["artifact"],
                                )
        # Get the model (or model version)
        model_resource = OneOf(model_version_upload_op.outputs["model"], model_upload_op.outputs["model"])

        # Batch prediction
        batch_predict_task = ModelBatchPredictOp(
                            project= project,
                            job_display_name= batch_prediction_job_display_name,
                            model= model_resource,
                            location= location,
                            instances_format= batch_predictions_input_format,
                            predictions_format= batch_predictions_output_format,
                            gcs_source_uris= test_data_gcs_uri,
                            gcs_destination_output_uri_prefix= batch_predictions_gcs_prefix,
                            machine_type= 'n1-standard-2'
                            )
        # Evaluation task
        evaluation_task = ModelEvaluationRegressionOp(
                            project= project,
                            target_field_name= target_field_name,
                            location= location,
                            # model= model_resource,
                            predictions_format= batch_predictions_output_format,
                            predictions_gcs_source= batch_predict_task.outputs["gcs_output_directory"],
                            ground_truth_format= ground_truth_format,
                            ground_truth_gcs_source= ground_truth_gcs_source
                            )
    return
Your pipeline consists of a graph of tasks that make use the following Google Cloud Pipeline Components:
CustomTrainingJobOp: Runs custom training jobs in Vertex AI.ModelUploadOp: Uploads the trained machine learning model to model registry.ModelBatchPredictOp: Creates a batch prediction job.ModelEvaluationRegressionOp: Evaluates a regression batch job.VertexNotificationEmailOp: Sends email notifications.
Compile the pipeline
Compile the pipeline using the Kubeflow Pipelines (KFP) compiler to a YAML file containing a hermetic representation of your pipeline.
from kfp import dsl
from kfp import compiler

compiler.Compiler().compile(
    pipeline_func=custom_model_training_evaluation_pipeline,
    package_path="{}.yaml".format(PIPELINE_NAME),
)
You should see a YAML file named vertex-pipeline-datatrigger-tutorial.yaml in
your working directory.
Upload the pipeline as a template
Create a repository of type
KFPin Artifact Registry.REPO_NAME = "mlops" # Create a repo in the artifact registry ! gcloud artifacts repositories create $REPO_NAME --location=$REGION --repository-format=KFPUpload the compiled pipeline to the repository.
from kfp.registry import RegistryClient

host = f"http://{REGION}-kfp.pkg.dev/{PROJECT_ID}/{REPO_NAME}"
client = RegistryClient(host=host)
TEMPLATE_NAME, VERSION_NAME = client.upload_pipeline(
file_name=PIPELINE_FILE,
tags=["v1", "latest"],
extra_headers={"description":"This is an example pipeline template."})
TEMPLATE_URI = f"http://{REGION}-kfp.pkg.dev/{PROJECT_ID}/{REPO_NAME}/{TEMPLATE_NAME}/latest"
In the Google Cloud console, verify that your template appears in Pipeline Templates.
Manually run the pipeline
To make sure that the pipeline works, run the pipeline manually.
In your notebook, specify the parameters that are needed to run the pipeline as a job.
DATASET_NAME = "mlops" TABLE_NAME = "chicago" worker_pool_specs = [{ "machine_spec": {"machine_type": "e2-highmem-2"}, "replica_count": 1, "python_package_spec":{ "executor_image_uri": "us-docker.pkg.dev/vertex-ai/training/sklearn-cpu.1-0:latest", "package_uris": [f"{BUCKET_URI}/trainer-0.1.tar.gz"], "python_module": "trainer.task", "args":["--project-id",PROJECT_ID, "--training-dir",f"/gcs/{BUCKET_NAME}","--bq-source",f"{PROJECT_ID}.{DATASET_NAME}.{TABLE_NAME}"] }, }] parameters = { "project": PROJECT_ID, "location": REGION, "training_job_display_name": "taxifare-prediction-training-job", "worker_pool_specs": worker_pool_specs, "base_output_dir": BUCKET_URI, "prediction_container_uri": "us-docker.pkg.dev/vertex-ai/prediction/sklearn-cpu.1-0:latest", "model_display_name": "taxifare-prediction-model", "batch_prediction_job_display_name": "taxifare-prediction-batch-job", "target_field_name": "fare", "test_data_gcs_uri": [f"{BUCKET_URI}/test_no_target.csv"], "ground_truth_gcs_source": [f"{BUCKET_URI}/test.csv"], "batch_predictions_gcs_prefix": f"{BUCKET_URI}/batch_predict_output", "existing_model": False }Create and run a pipeline job.
# Create a pipeline job
job = aiplatform.PipelineJob(
    display_name="triggered_custom_regression_evaluation",
    template_path=TEMPLATE_URI ,
    parameter_values=parameters,
    pipeline_root=BUCKET_URI,
    enable_caching=False
)
# Run the pipeline job
job.run()
The job takes about 30 minutes to complete.
In the console, you should see a new pipeline run in the Pipelines page:
After the pipeline run is complete, you should see either a new model named
taxifare-prediction-modelor a new model version in Vertex AI Model Registry:You should also see a new batch prediction job:
Create a function that triggers your pipeline
In this step, you create a Cloud Function (2nd gen) that runs the pipeline whenever new data is inserted into the BigQuery table.
Specifically, we use an Eventarc to trigger the function whenever a
google.cloud.bigquery.v2.JobService.InsertJob event occurs. The function then runs the pipeline template.
For more information, see Eventarc triggers and supported event types.
Create function with Eventarc trigger
In the Google Cloud console, go to the Cloud Functions.
Click the Create Function button. In the Configuration page:
Select 2nd gen as your environment.
For Function name, use mlops.
For Region, select the same region as your Cloud Storage bucket and Artifact Registry repository.
For Trigger Select Other trigger. The Eventarc Trigger pane opens.
For Trigger Type, choose Google Sources.
For Event Provider, choose BigQuery.
For Event type, choose
google.cloud.bigquery.v2.JobService.InsertJob.For Resource, choose Specific resource and specify the BigQuery table
projects/PROJECT_ID/datasets/mlops/tables/chicagoIn the Region field, select a location for the Eventarc trigger, if applicable. See Trigger location for more information.
Click Save Trigger.
If you are asked to grant roles to service account(s), click Grant All.
Click Next to go to the Code page. In the Code page:
Set the Runtime to python 3.12.
Set the Entry point to
mlops_entrypoint.With the Inline Editor, open the file
main.pyand replace the contents with the following:Replace
PROJECT_ID,REGION,BUCKET_NAMEwith the values you used earlier.import json import functions_framework import requests import google.auth import google.auth.transport.requests # CloudEvent function to be triggered by an Eventarc Cloud Audit Logging trigger # Note: this is NOT designed for second-party (Cloud Audit Logs -> Pub/Sub) triggers! @functions_framework.cloud_event def mlops_entrypoint(cloudevent): # Print out the CloudEvent's (required) `type` property # See http://github.com/cloudevents/spec/blob/v1.0.1/spec.md#type print(f"Event type: {cloudevent['type']}") # Print out the CloudEvent's (optional) `subject` property # See http://github.com/cloudevents/spec/blob/v1.0.1/spec.md#subject if 'subject' in cloudevent: # CloudEvent objects don't support `get` operations. # Use the `in` operator to verify `subject` is present. print(f"Subject: {cloudevent['subject']}") # Print out details from the `protoPayload` # This field encapsulates a Cloud Audit Logging entry # See http://cloud.go888ogle.com.fqhub.com/logging/docs/audit#audit_log_entry_structure payload = cloudevent.data.get("protoPayload") if payload: print(f"API method: {payload.get('methodName')}") print(f"Resource name: {payload.get('resourceName')}") print(f"Principal: {payload.get('authenticationInfo', dict()).get('principalEmail')}") row_count = payload.get('metadata', dict()).get('tableDataChange',dict()).get('insertedRowsCount') print(f"No. of rows: {row_count} !!") if row_count: if int(row_count) > 0: print ("Pipeline trigger Condition met !!") submit_pipeline_job() else: print ("No pipeline triggered !!!") def submit_pipeline_job(): PROJECT_ID = 'PROJECT_ID' REGION = 'REGION' BUCKET_NAME = "BUCKET_NAME" DATASET_NAME = "mlops" TABLE_NAME = "chicago" base_output_dir = BUCKET_NAME BUCKET_URI = "gs://{}".format(BUCKET_NAME) PIPELINE_ROOT = "{}/pipeline_root/chicago-taxi-pipe".format(BUCKET_URI) PIPELINE_NAME = "vertex-mlops-pipeline-tutorial" EXPERIMENT_NAME = PIPELINE_NAME + "-experiment" REPO_NAME ="mlops" TEMPLATE_NAME="custom-model-training-evaluation-pipeline" TRAINING_JOB_DISPLAY_NAME="taxifare-prediction-training-job" worker_pool_specs = [{ "machine_spec": {"machine_type": "e2-highmem-2"}, "replica_count": 1, "python_package_spec":{ "executor_image_uri": "us-docker.pkg.dev/vertex-ai/training/sklearn-cpu.1-0:latest", "package_uris": [f"{BUCKET_URI}/trainer-0.1.tar.gz"], "python_module": "trainer.task", "args":["--project-id",PROJECT_ID,"--training-dir",f"/gcs/{BUCKET_NAME}","--bq-source",f"{PROJECT_ID}.{DATASET_NAME}.{TABLE_NAME}"] }, }] parameters = { "project": PROJECT_ID, "location": REGION, "training_job_display_name": "taxifare-prediction-training-job", "worker_pool_specs": worker_pool_specs, "base_output_dir": BUCKET_URI, "prediction_container_uri": "us-docker.pkg.dev/vertex-ai/prediction/sklearn-cpu.1-0:latest", "model_display_name": "taxifare-prediction-model", "batch_prediction_job_display_name": "taxifare-prediction-batch-job", "target_field_name": "fare", "test_data_gcs_uri": [f"{BUCKET_URI}/test_no_target.csv"], "ground_truth_gcs_source": [f"{BUCKET_URI}/test.csv"], "batch_predictions_gcs_prefix": f"{BUCKET_URI}/batch_predict_output", "existing_model": False } TEMPLATE_URI = f"http://{REGION}-kfp.pkg.dev/{PROJECT_ID}/{REPO_NAME}/{TEMPLATE_NAME}/latest" print("TEMPLATE URI: ", TEMPLATE_URI) request_body = { "name": PIPELINE_NAME, "displayName": PIPELINE_NAME, "runtimeConfig":{ "gcsOutputDirectory": PIPELINE_ROOT, "parameterValues": parameters, }, "templateUri": TEMPLATE_URI } pipeline_url = "http://us-central1-aiplatform.googleapis.com/v1/projects/{}/locations/{}/pipelineJobs".format(PROJECT_ID, REGION) creds, project = google.auth.default() auth_req = google.auth.transport.requests.Request() creds.refresh(auth_req) headers = { 'Authorization': 'Bearer {}'.format(creds.token), 'Content-Type': 'application/json; charset=utf-8' } response = requests.request("POST", pipeline_url, headers=headers, data=json.dumps(request_body)) print(response.text)Open the file
requirements.txtand replace the contents with the following:requests==2.31.0 google-auth==2.25.1
Click Deploy to deploy the function.
Insert data to trigger the pipeline
In the Google Cloud console, go to BigQuery Studio.
Click Create SQL Query and run the following SQL query by clicking Run.
INSERT INTO `PROJECT_ID.mlops.chicago`
(
    WITH
      taxitrips AS (
      SELECT
        trip_start_timestamp,
        trip_end_timestamp,
        trip_seconds,
        trip_miles,
        payment_type,
        pickup_longitude,
        pickup_latitude,
        dropoff_longitude,
        dropoff_latitude,
        tips,
        tolls,
        fare,
        pickup_community_area,
        dropoff_community_area,
        company,
        unique_key
      FROM
        `bigquery-public-data.chicago_taxi_trips.taxi_trips`
      WHERE pickup_longitude IS NOT NULL
      AND pickup_latitude IS NOT NULL
      AND dropoff_longitude IS NOT NULL
      AND dropoff_latitude IS NOT NULL
      AND trip_miles > 0
      AND trip_seconds > 0
      AND fare > 0
      AND EXTRACT(YEAR FROM trip_start_timestamp) = 2022
    )

    SELECT
      trip_start_timestamp,
      EXTRACT(MONTH from trip_start_timestamp) as trip_month,
      EXTRACT(DAY from trip_start_timestamp) as trip_day,
      EXTRACT(DAYOFWEEK from trip_start_timestamp) as trip_day_of_week,
      EXTRACT(HOUR from trip_start_timestamp) as trip_hour,
      trip_seconds,
      trip_miles,
      payment_type,
      ST_AsText(
          ST_SnapToGrid(ST_GeogPoint(pickup_longitude, pickup_latitude), 0.1)
      ) AS pickup_grid,
      ST_AsText(
          ST_SnapToGrid(ST_GeogPoint(dropoff_longitude, dropoff_latitude), 0.1)
      ) AS dropoff_grid,
      ST_Distance(
          ST_GeogPoint(pickup_longitude, pickup_latitude),
          ST_GeogPoint(dropoff_longitude, dropoff_latitude)
      ) AS euclidean,
      CONCAT(
          ST_AsText(ST_SnapToGrid(ST_GeogPoint(pickup_longitude,
              pickup_latitude), 0.1)),
          ST_AsText(ST_SnapToGrid(ST_GeogPoint(dropoff_longitude,
              dropoff_latitude), 0.1))
      ) AS loc_cross,
      IF((tips/fare >= 0.2), 1, 0) AS tip_bin,
      tips,
      tolls,
      fare,
      pickup_longitude,
      pickup_latitude,
      dropoff_longitude,
      dropoff_latitude,
      pickup_community_area,
      dropoff_community_area,
      company,
      unique_key,
      trip_end_timestamp
    FROM
      taxitrips
    LIMIT 1000000
)
This SQL query to insert new rows into the table.
To verify whether the event was triggered, search your function's log for
pipeline trigger condition met.If the function is triggered successfully, you should see a new pipeline run in Vertex AI Pipelines. The pipeline job takes about 30 minutes to complete.
Clean up
To clean up all Google Cloud resources used for this project, you can delete the Google Cloud project you used for the tutorial.
Else, you can delete the individual resources you created for this tutorial.
Delete resources from Vertex AI.
Delete model(s) from Vertex AI Model Registry.
The other Vertex AI resources are just records of jobs that ran earlier.
Delete pipeline runs:
Delete Custom training jobs:
Delete Batch prediction jobs: