이 문서에서는 Vertex AI Pipelines 및 Cloud Functions를 사용하여 새 데이터를 데이터 세트에 삽입할 때마다 커스텀 모델을 자동으로 학습시키는 파이프라인을 빌드하는 데 필요한 단계를 설명합니다.
목표
다음 단계에서는 이 프로세스를 다룹니다.
BigQuery에서 데이터 세트를 획득하고 준비합니다.
커스텀 학습 패키지를 만들고 업로드합니다. 실행하면 데이터 세트에서 데이터를 읽고 모델을 학습시킵니다.
Vertex AI 파이프라인 빌드. 이 파이프라인은 커스텀 학습 패키지를 실행하고 모델을 Vertex AI Model Registry에 업로드하고 평가 작업을 실행한 후 이메일 알림을 보냅니다.
파이프라인을 수동으로 실행합니다.
새 데이터를 BigQuery 데이터 세트에 삽입할 때마다 파이프라인을 실행하는 Eventarc 트리거로 Cloud 함수를 만듭니다.
시작하기 전에
프로젝트와 노트북을 설정합니다.
프로젝트 설정
-
Google Cloud Console에서 프로젝트 선택기 페이지로 이동합니다.
-
Google Cloud 프로젝트를 선택하거나 만듭니다.
노트북 만들기
Colab Enterprise 노트북을 사용하여 이 튜토리얼의 일부 코드를 실행합니다.
프로젝트 소유자가 아닌 경우 프로젝트 소유자가
roles/resourcemanager.projectIamAdmin및roles/aiplatform.colabEnterpriseUserIAM 역할을 부여하도록 합니다.Colab Enterprise를 사용하고 IAM 역할과 권한을 개발자 자신과 서비스 계정에 부여하려면 이러한 역할이 있어야 합니다.
Google Cloud 콘솔에서 Colab Enterprise Notebooks 페이지로 이동합니다.
다음 필수 API가 아직 사용 설정되지 않았으면 Colab Enterprise에 이를 사용 설정하라는 메시지가 표시됩니다.
- Vertex AI API
- Dataform API
- Compute Engine API
리전 메뉴에서 노트북을 만들 리전을 선택합니다. 확실하지 않으면 us-central1을 리전으로 사용합니다.
이 튜토리얼의 모든 리소스에 같은 리전을 사용합니다.
새 노트북 만들기를 클릭합니다.
새 노트북이 내 노트북 탭에 표시됩니다. 노트북에서 코드를 실행하려면 코드 셀을 추가하고 셀 실행 버튼을 클릭합니다.
개발 환경 설정
노트북에서 다음 Python3 패키지를 설치합니다.
! pip3 install  google-cloud-aiplatform==1.34.0 \
                google-cloud-pipeline-components==2.6.0 \
                kfp==2.4.0 \
                scikit-learn==1.0.2 \
                mlflow==2.10.0
다음을 실행하여 Google Cloud CLI 프로젝트를 설정합니다.
PROJECT_ID = "PROJECT_ID" # Set the project id ! gcloud config set project {PROJECT_ID}PROJECT_ID를 프로젝트 ID로 바꿉니다. 필요한 경우 Google Cloud 콘솔에서 프로젝트 ID를 찾을 수 있습니다.
Google 계정에 역할을 부여합니다.
! gcloud projects add-iam-policy-binding PROJECT_ID --member="user:"EMAIL_ADDRESS"" --role=roles/bigquery.admin
! gcloud projects add-iam-policy-binding PROJECT_ID --member="user:"EMAIL_ADDRESS"" --role=roles/aiplatform.user
! gcloud projects add-iam-policy-binding PROJECT_ID --member="user:"EMAIL_ADDRESS"" --role=roles/storage.admin
! gcloud projects add-iam-policy-binding PROJECT_ID --member="user:"EMAIL_ADDRESS"" --role=roles/pubsub.editor
! gcloud projects add-iam-policy-binding PROJECT_ID --member="user:"EMAIL_ADDRESS"" --role=roles/cloudfunctions.admin
! gcloud projects add-iam-policy-binding PROJECT_ID --member="user:"EMAIL_ADDRESS"" --role=roles/logging.viewer
! gcloud projects add-iam-policy-binding PROJECT_ID --member="user:"EMAIL_ADDRESS"" --role=roles/logging.configWriter
! gcloud projects add-iam-policy-binding PROJECT_ID --member="user:"EMAIL_ADDRESS"" --role=roles/iam.serviceAccountUser
! gcloud projects add-iam-policy-binding PROJECT_ID --member="user:"EMAIL_ADDRESS"" --role=roles/eventarc.admin
! gcloud projects add-iam-policy-binding PROJECT_ID --member="user:"EMAIL_ADDRESS"" --role=roles/aiplatform.colabEnterpriseUser
! gcloud projects add-iam-policy-binding PROJECT_ID --member="user:"EMAIL_ADDRESS"" --role=roles/artifactregistry.admin
! gcloud projects add-iam-policy-binding PROJECT_ID --member="user:"EMAIL_ADDRESS"" --role=roles/serviceusage.serviceUsageAdmin
다음 API를 사용 설정합니다.
- Artifact Registry API
- BigQuery API
- Cloud Build API
- Cloud Functions API
- Cloud Logging API
- Pub/Sub API
- Cloud Run Admin API
- Cloud Storage API
- Eventarc API
- Service Usage API
- Vertex AI API
! gcloud services enable artifactregistry.googleapis.com bigquery.googleapis.com cloudbuild.googleapis.com cloudfunctions.googleapis.com logging.googleapis.com pubsub.googleapis.com run.googleapis.com storage-component.googleapis.com eventarc.googleapis.com serviceusage.googleapis.com aiplatform.googleapis.com프로젝트의 서비스 계정에 역할을 부여합니다.
서비스 계정 이름을 확인합니다.
! gcloud iam service-accounts listCompute 서비스 에이전트 이름을 기록해 둡니다.
[email protected]형식이어야 합니다.서비스 에이전트에 필요한 역할을 부여합니다.
! gcloud projects add-iam-policy-binding PROJECT_ID --member="serviceAccount:"SA_ID[email protected]"" --role=roles/aiplatform.serviceAgent
! gcloud projects add-iam-policy-binding PROJECT_ID --member="serviceAccount:"SA_ID[email protected]"" --role=roles/eventarc.eventReceiver
데이터 세트 획득 및 준비
이 튜토리얼에서는 탑승 시간, 위치, 거리와 같은 특성을 기반으로 택시 탑승 요금을 예측하는 모델을 빌드합니다. 여기에서는 공개 시카고 택시 운행 데이터 세트의 데이터를 사용합니다. 이 데이터 세트에는 2013년부터 현재까지 시카고 규제 기관에 보고된 택시 운행 정보가 포함되어 있습니다. 택시 운전자와 승객의 개인 정보를 동시에 보호하고 애그리게이터에서 데이터를 분석할 수 있도록 택시 ID는 지정된 택시 면허 번호에 대해 일관되게 유지되지만 번호를 표시하지 않으며 인구조사는 경우에 따라 억제되며 시간은 약 15분으로 반올림됩니다.
자세한 내용은 Marketplace에서 시카고 택시 운행을 참고하세요.
BigQuery 데이터 세트 만들기
Google Cloud 콘솔에서 BigQuery Studio로 이동합니다.
탐색기 패널에서 프로젝트를 찾아 작업을 클릭한 후 데이터 세트 만들기를 클릭합니다.
데이터 세트 만들기 페이지에서 다음을 실행합니다.
데이터 세트 ID에
mlops를 입력합니다. 자세한 내용은 데이터 세트 이름 지정을 참조하세요.위치 유형에 멀티 리전을 선택합니다. 예를 들어
us-central1을 사용하는 경우 US(미국 내 여러 리전)를 선택합니다. 데이터 세트가 생성된 후에는 위치를 변경할 수 없습니다.데이터 세트 만들기를 클릭합니다.
자세한 내용은 데이터 세트를 만드는 방법을 참조하세요.
BigQuery 테이블 만들기 및 채우기
이 섹션에서는 테이블을 만들고 1년 분량의 데이터를 공개 데이터 세트에서 프로젝트 데이터 세트로 가져옵니다.
BigQuery Studio로 이동합니다.
SQL 쿼리 만들기를 클릭하고 실행을 클릭하여 다음 SQL 쿼리를 실행합니다.
CREATE OR REPLACE TABLE `PROJECT_ID.mlops.chicago`
AS (
    WITH
      taxitrips AS (
      SELECT
        trip_start_timestamp,
        trip_end_timestamp,
        trip_seconds,
        trip_miles,
        payment_type,
        pickup_longitude,
        pickup_latitude,
        dropoff_longitude,
        dropoff_latitude,
        tips,
        tolls,
        fare,
        pickup_community_area,
        dropoff_community_area,
        company,
        unique_key
      FROM
        `bigquery-public-data.chicago_taxi_trips.taxi_trips`
      WHERE pickup_longitude IS NOT NULL
      AND pickup_latitude IS NOT NULL
      AND dropoff_longitude IS NOT NULL
      AND dropoff_latitude IS NOT NULL
      AND trip_miles > 0
      AND trip_seconds > 0
      AND fare > 0
      AND EXTRACT(YEAR FROM trip_start_timestamp) = 2019
    )

    SELECT
      trip_start_timestamp,
      EXTRACT(MONTH from trip_start_timestamp) as trip_month,
      EXTRACT(DAY from trip_start_timestamp) as trip_day,
      EXTRACT(DAYOFWEEK from trip_start_timestamp) as trip_day_of_week,
      EXTRACT(HOUR from trip_start_timestamp) as trip_hour,
      trip_seconds,
      trip_miles,
      payment_type,
      ST_AsText(
          ST_SnapToGrid(ST_GeogPoint(pickup_longitude, pickup_latitude), 0.1)
      ) AS pickup_grid,
      ST_AsText(
          ST_SnapToGrid(ST_GeogPoint(dropoff_longitude, dropoff_latitude), 0.1)
      ) AS dropoff_grid,
      ST_Distance(
          ST_GeogPoint(pickup_longitude, pickup_latitude),
          ST_GeogPoint(dropoff_longitude, dropoff_latitude)
      ) AS euclidean,
      CONCAT(
          ST_AsText(ST_SnapToGrid(ST_GeogPoint(pickup_longitude,
              pickup_latitude), 0.1)),
          ST_AsText(ST_SnapToGrid(ST_GeogPoint(dropoff_longitude,
              dropoff_latitude), 0.1))
      ) AS loc_cross,
      IF((tips/fare >= 0.2), 1, 0) AS tip_bin,
      tips,
      tolls,
      fare,
      pickup_longitude,
      pickup_latitude,
      dropoff_longitude,
      dropoff_latitude,
      pickup_community_area,
      dropoff_community_area,
      company,
      unique_key,
      trip_end_timestamp
    FROM
      taxitrips
    LIMIT 1000000
)
이 쿼리는
<PROJECT_ID>.mlops.chicago테이블을 만들고 공개bigquery-public-data.chicago_taxi_trips.taxi_trips테이블의 데이터로 채웁니다.테이블 스키마를 보려면 테이블로 이동을 클릭한 후 스키마 탭을 클릭합니다.
테이블 콘텐츠를 보려면 미리보기 탭을 클릭합니다.
커스텀 학습 패키지 만들기 및 업로드
이 섹션에서는 데이터 세트를 읽고 데이터를 학습 세트와 테스트 세트로 분할하며 커스텀 모델을 학습시키는 코드가 포함된 Python 패키지를 만듭니다. 이 패키지는 파이프라인의 태스크 중 하나로 실행됩니다. 자세한 내용은 사전 빌드된 컨테이너의 Python 학습 애플리케이션 빌드를 참조하세요.
커스텀 학습 패키지 만들기
Colab 노트북에서 학습 애플리케이션의 상위 폴더를 만듭니다.
!mkdir -p training_package/trainer다음 명령어를 사용하여 각 폴더에
__init__.py파일을 만들고 패키지로 만듭니다.! touch training_package/__init__.py ! touch training_package/trainer/__init__.py파일 폴더 패널에서 새 파일과 폴더를 볼 수 있습니다.
파일 패널에서 다음 콘텐츠로 training_package/trainer 폴더에
task.py파일을 만듭니다.# Import the libraries from sklearn.model_selection import train_test_split, cross_val_score from sklearn.preprocessing import OneHotEncoder, StandardScaler from google.cloud import bigquery, bigquery_storage from sklearn.ensemble import RandomForestRegressor from sklearn.compose import ColumnTransformer from sklearn.pipeline import Pipeline from google import auth from scipy import stats import numpy as np import argparse import joblib import pickle import csv import os # add parser arguments parser = argparse.ArgumentParser() parser.add_argument('--project-id', dest='project_id', type=str, help='Project ID.') parser.add_argument('--training-dir', dest='training_dir', default=os.getenv("AIP_MODEL_DIR"), type=str, help='Dir to save the data and the trained model.') parser.add_argument('--bq-source', dest='bq_source', type=str, help='BigQuery data source for training data.') args = parser.parse_args() # data preparation code BQ_QUERY = """ with tmp_table as ( SELECT trip_seconds, trip_miles, fare, tolls, company, pickup_latitude, pickup_longitude, dropoff_latitude, dropoff_longitude, DATETIME(trip_start_timestamp, 'America/Chicago') trip_start_timestamp, DATETIME(trip_end_timestamp, 'America/Chicago') trip_end_timestamp, CASE WHEN (pickup_community_area IN (56, 64, 76)) OR (dropoff_community_area IN (56, 64, 76)) THEN 1 else 0 END is_airport, FROM `{}` WHERE dropoff_latitude IS NOT NULL and dropoff_longitude IS NOT NULL and pickup_latitude IS NOT NULL and pickup_longitude IS NOT NULL and fare > 0 and trip_miles > 0 and MOD(ABS(FARM_FINGERPRINT(unique_key)), 100) between 0 and 99 ORDER BY RAND() LIMIT 10000) SELECT *, EXTRACT(YEAR FROM trip_start_timestamp) trip_start_year, EXTRACT(MONTH FROM trip_start_timestamp) trip_start_month, EXTRACT(DAY FROM trip_start_timestamp) trip_start_day, EXTRACT(HOUR FROM trip_start_timestamp) trip_start_hour, FORMAT_DATE('%a', DATE(trip_start_timestamp)) trip_start_day_of_week FROM tmp_table """.format(args.bq_source) # Get default credentials credentials, project = auth.default() bqclient = bigquery.Client(credentials=credentials, project=args.project_id) bqstorageclient = bigquery_storage.BigQueryReadClient(credentials=credentials) df = ( bqclient.query(BQ_QUERY) .result() .to_dataframe(bqstorage_client=bqstorageclient) ) # Add 'N/A' for missing 'Company' df.fillna(value={'company':'N/A','tolls':0}, inplace=True) # Drop rows containing null data. df.dropna(how='any', axis='rows', inplace=True) # Pickup and dropoff locations distance df['abs_distance'] = (np.hypot(df['dropoff_latitude']-df['pickup_latitude'], df['dropoff_longitude']-df['pickup_longitude']))*100 # Remove extremes, outliers possible_outliers_cols = ['trip_seconds', 'trip_miles', 'fare', 'abs_distance'] df=df[(np.abs(stats.zscore(df[possible_outliers_cols].astype(float))) < 3).all(axis=1)].copy() # Reduce location accuracy df=df.round({'pickup_latitude': 3, 'pickup_longitude': 3, 'dropoff_latitude':3, 'dropoff_longitude':3}) # Drop the timestamp col X=df.drop(['trip_start_timestamp', 'trip_end_timestamp'],axis=1) # Split the data into train and test X_train, X_test = train_test_split(X, test_size=0.10, random_state=123) ## Format the data for batch predictions # select string cols string_cols = X_test.select_dtypes(include='object').columns # Add quotes around string fields X_test[string_cols] = X_test[string_cols].apply(lambda x: '\"' + x + '\"') # Add quotes around column names X_test.columns = ['\"' + col + '\"' for col in X_test.columns] # Save DataFrame to csv X_test.to_csv(os.path.join(args.training_dir,"test.csv"),index=False,quoting=csv.QUOTE_NONE, escapechar=' ') # Save test data without the target for batch predictions X_test.drop('\"fare\"',axis=1,inplace=True) X_test.to_csv(os.path.join(args.training_dir,"test_no_target.csv"),index=False,quoting=csv.QUOTE_NONE, escapechar=' ') # Separate the target column y_train=X_train.pop('fare') # Get the column indexes col_index_dict = {col: idx for idx, col in enumerate(X_train.columns)} # Create a column transformer pipeline ct_pipe = ColumnTransformer(transformers=[ ('hourly_cat', OneHotEncoder(categories=[range(0,24)], sparse = False), [col_index_dict['trip_start_hour']]), ('dow', OneHotEncoder(categories=[['Mon', 'Tue', 'Sun', 'Wed', 'Sat', 'Fri', 'Thu']], sparse = False), [col_index_dict['trip_start_day_of_week']]), ('std_scaler', StandardScaler(), [ col_index_dict['trip_start_year'], col_index_dict['abs_distance'], col_index_dict['pickup_longitude'], col_index_dict['pickup_latitude'], col_index_dict['dropoff_longitude'], col_index_dict['dropoff_latitude'], col_index_dict['trip_miles'], col_index_dict['trip_seconds']]) ]) # Add the random-forest estimator to the pipeline rfr_pipe = Pipeline([ ('ct', ct_pipe), ('forest_reg', RandomForestRegressor( n_estimators = 20, max_features = 1.0, n_jobs = -1, random_state = 3, max_depth=None, max_leaf_nodes=None, )) ]) # train the model rfr_score = cross_val_score(rfr_pipe, X_train, y_train, scoring = 'neg_mean_squared_error', cv = 5) rfr_rmse = np.sqrt(-rfr_score) print ("Crossvalidation RMSE:",rfr_rmse.mean()) final_model=rfr_pipe.fit(X_train, y_train) # Save the model pipeline with open(os.path.join(args.training_dir,"model.pkl"), 'wb') as model_file: pickle.dump(final_model, model_file)이 코드는 다음 태스크를 수행합니다.
- 특성 선택
- 픽업 및 반납 데이터 시간을 UTC에서 시카고 현지 시간으로 변환
- 픽업 날짜/시간에서 날짜, 시간, 요일, 월, 연도 추출
- 시작 및 종료 시간을 사용하여 이동 기간 계산
- 공동체 지역을 기반으로 공항에서 시작하거나 종료된 여행 식별 및 표시
- 랜덤 포레스트 회귀 모델은 scikit-learn 프레임워크를 사용하여 택시 운행 요금을 예측하도록 학습됩니다.
학습된 모델은 피클 파일
model.pkl에 저장됩니다.선택된 방식 및 특성 추출은 시카고 택시 요금 예측에 대한 데이터 탐색과 분석을 기반으로 합니다.
파일 패널에서 다음 콘텐츠로 training_package 폴더에
setup.py파일을 만듭니다.from setuptools import find_packages from setuptools import setup REQUIRED_PACKAGES=["google-cloud-bigquery[pandas]","google-cloud-bigquery-storage"] setup( name='trainer', version='0.1', install_requires=REQUIRED_PACKAGES, packages=find_packages(), include_package_data=True, description='Training application package for chicago taxi trip fare prediction.' )노트북에서
setup.py를 실행하여 학습 애플리케이션의 소스 배포를 만듭니다.! cd training_package && python setup.py sdist --formats=gztar && cd ..
이 섹션 끝에서 파일 패널의 training-package 아래에 다음 파일과 폴더가 포함됩니다.
dist
  trainer-0.1.tar.gz
trainer
  __init__.py
  task.py
trainer.egg-info
__init__.py
setup.py
Cloud Storage에 커스텀 학습 패키지 업로드
Cloud Storage 버킷 만들기
REGION="REGION"
BUCKET_NAME = "BUCKET_NAME"
BUCKET_URI = f"gs://{BUCKET_NAME}"

! gsutil mb -l $REGION -p $PROJECT_ID $BUCKET_URI
다음 매개변수 값을 바꿉니다.
REGION: Colab 노트북을 만들 때 선택한 리전과 동일한 리전을 선택합니다.BUCKET_NAME: 버킷 이름입니다.
학습 패키지를 Cloud Storage 버킷에 업로드합니다.
# Copy the training package to the bucket
! gsutil cp training_package/dist/trainer-0.1.tar.gz $BUCKET_URI/
파이프라인 빌드
파이프라인은 파이프라인 태스크라고 하는 단계의 그래프로 표현된 MLOps 워크플로에 대한 설명입니다.
이 섹션에서는 파이프라인 태스크를 정의하고 YAML로 컴파일하며 파이프라인을 Artifact Registry에 등록하여 단일 사용자나 여러 사용자가 버전을 제어하고 여러 번 실행할 수 있게 합니다.
다음은 모델 학습, 모델 업로드, 모델 평가, 이메일 알림을 포함한 파이프라인의 태스크를 시각화한 것입니다.
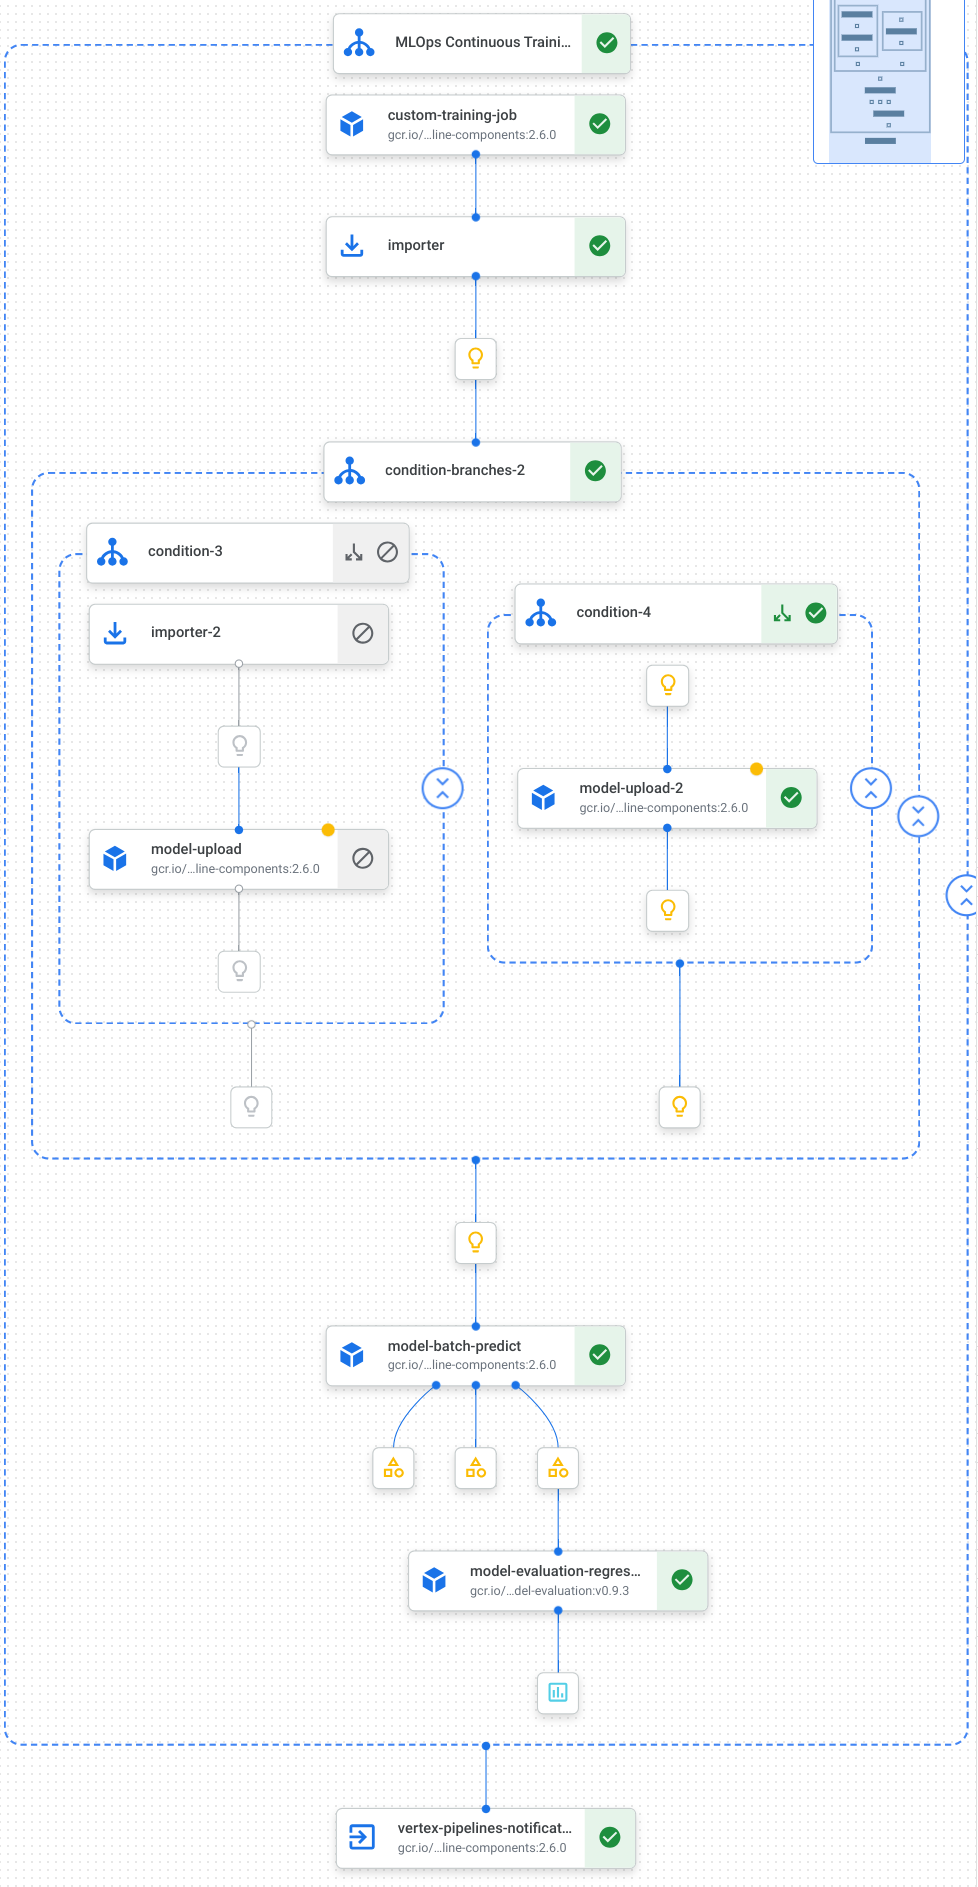
자세한 내용은 파이프라인 템플릿 만들기를 참조하세요.
상수 정의 및 클라이언트 초기화
노트북에서 이후 단계에서 사용할 상수를 정의합니다.
import os EMAIL_RECIPIENTS = [ "NOTIFY_EMAIL" ] PIPELINE_ROOT = "{}/pipeline_root/chicago-taxi-pipe".format(BUCKET_URI) PIPELINE_NAME = "vertex-pipeline-datatrigger-tutorial" WORKING_DIR = f"{PIPELINE_ROOT}/mlops-datatrigger-tutorial" os.environ['AIP_MODEL_DIR'] = WORKING_DIR EXPERIMENT_NAME = PIPELINE_NAME + "-experiment" PIPELINE_FILE = PIPELINE_NAME + ".yaml"NOTIFY_EMAIL을 이메일 주소로 바꿉니다. 파이프라인 작업이 완료되면 성공 여부와 관계없이 이메일이 해당 이메일 주소로 전송됩니다.프로젝트, 스테이징 버킷, 위치, 실험으로 Vertex AI SDK를 초기화합니다.
from google.cloud import aiplatform

aiplatform.init(
    project=PROJECT_ID,
    staging_bucket=BUCKET_URI,
    location=REGION,
    experiment=EXPERIMENT_NAME)

aiplatform.autolog()
파이프라인 태스크 정의
노트북에서 파이프라인 custom_model_training_evaluation_pipeline을 정의합니다.
from kfp import dsl
from kfp.dsl import importer
from kfp.dsl import OneOf
from google_cloud_pipeline_components.v1.custom_job import CustomTrainingJobOp
from google_cloud_pipeline_components.types import artifact_types
from google_cloud_pipeline_components.v1.model import ModelUploadOp
from google_cloud_pipeline_components.v1.batch_predict_job import ModelBatchPredictOp
from google_cloud_pipeline_components.v1.model_evaluation import ModelEvaluationRegressionOp
from google_cloud_pipeline_components.v1.vertex_notification_email import VertexNotificationEmailOp
from google_cloud_pipeline_components.v1.endpoint import ModelDeployOp
from google_cloud_pipeline_components.v1.endpoint import EndpointCreateOp
from google.cloud import aiplatform

# define the train-deploy pipeline
@dsl.pipeline(name="custom-model-training-evaluation-pipeline")
def custom_model_training_evaluation_pipeline(
    project: str,
    location: str,
    training_job_display_name: str,
    worker_pool_specs: list,
    base_output_dir: str,
    prediction_container_uri: str,
    model_display_name: str,
    batch_prediction_job_display_name: str,
    target_field_name: str,
    test_data_gcs_uri: list,
    ground_truth_gcs_source: list,
    batch_predictions_gcs_prefix: str,
    batch_predictions_input_format: str="csv",
    batch_predictions_output_format: str="jsonl",
    ground_truth_format: str="csv",
    parent_model_resource_name: str=None,
    parent_model_artifact_uri: str=None,
    existing_model: bool=False

):
    # Notification task
    notify_task = VertexNotificationEmailOp(
                    recipients= EMAIL_RECIPIENTS
                    )
    with dsl.ExitHandler(notify_task, name='MLOps Continuous Training Pipeline'):
        # Train the model
        custom_job_task = CustomTrainingJobOp(
                                    project=project,
                                    display_name=training_job_display_name,
                                    worker_pool_specs=worker_pool_specs,
                                    base_output_directory=base_output_dir,
                                    location=location
                            )

        # Import the unmanaged model
        import_unmanaged_model_task = importer(
                                        artifact_uri=base_output_dir,
                                        artifact_class=artifact_types.UnmanagedContainerModel,
                                        metadata={
                                            "containerSpec": {
                                                "imageUri": prediction_container_uri,
                                            },
                                        },
                                    ).after(custom_job_task)

        with dsl.If(existing_model == True):
            # Import the parent model to upload as a version
            import_registry_model_task = importer(
                                        artifact_uri=parent_model_artifact_uri,
                                        artifact_class=artifact_types.VertexModel,
                                        metadata={
                                            "resourceName": parent_model_resource_name
                                        },
                                    ).after(import_unmanaged_model_task)
            # Upload the model as a version
            model_version_upload_op = ModelUploadOp(
                                    project=project,
                                    location=location,
                                    display_name=model_display_name,
                                    parent_model=import_registry_model_task.outputs["artifact"],
                                    unmanaged_container_model=import_unmanaged_model_task.outputs["artifact"],
                                )

        with dsl.Else():
            # Upload the model
            model_upload_op = ModelUploadOp(
                                    project=project,
                                    location=location,
                                    display_name=model_display_name,
                                    unmanaged_container_model=import_unmanaged_model_task.outputs["artifact"],
                                )
        # Get the model (or model version)
        model_resource = OneOf(model_version_upload_op.outputs["model"], model_upload_op.outputs["model"])

        # Batch prediction
        batch_predict_task = ModelBatchPredictOp(
                            project= project,
                            job_display_name= batch_prediction_job_display_name,
                            model= model_resource,
                            location= location,
                            instances_format= batch_predictions_input_format,
                            predictions_format= batch_predictions_output_format,
                            gcs_source_uris= test_data_gcs_uri,
                            gcs_destination_output_uri_prefix= batch_predictions_gcs_prefix,
                            machine_type= 'n1-standard-2'
                            )
        # Evaluation task
        evaluation_task = ModelEvaluationRegressionOp(
                            project= project,
                            target_field_name= target_field_name,
                            location= location,
                            # model= model_resource,
                            predictions_format= batch_predictions_output_format,
                            predictions_gcs_source= batch_predict_task.outputs["gcs_output_directory"],
                            ground_truth_format= ground_truth_format,
                            ground_truth_gcs_source= ground_truth_gcs_source
                            )
    return
파이프라인은 다음 Google Cloud 파이프라인 구성요소를 사용하는 태스크의 그래프로 구성됩니다.
CustomTrainingJobOp: Vertex AI에서 커스텀 학습 작업을 실행합니다.ModelUploadOp: 학습된 머신러닝 모델을 모델 레지스트리에 업로드합니다.ModelBatchPredictOp: 일괄 예측 작업을 만듭니다.ModelEvaluationRegressionOp: 회귀 일괄 작업을 평가합니다.VertexNotificationEmailOp: 이메일 알림을 보냅니다.
파이프라인 컴파일
Kubeflow Pipelines(KFP) 컴파일러를 사용하여 파이프라인을 밀폐된 파이프라인 표현이 포함된 YAML 파일로 컴파일합니다.
from kfp import dsl
from kfp import compiler

compiler.Compiler().compile(
    pipeline_func=custom_model_training_evaluation_pipeline,
    package_path="{}.yaml".format(PIPELINE_NAME),
)
작업 디렉터리에 vertex-pipeline-datatrigger-tutorial.yaml이라는 YAML 파일이 표시됩니다.
파이프라인을 템플릿으로 업로드
Artifact Registry에서
KFP유형의 저장소를 만듭니다.REPO_NAME = "mlops" # Create a repo in the artifact registry ! gcloud artifacts repositories create $REPO_NAME --location=$REGION --repository-format=KFP컴파일된 파이프라인을 저장소에 업로드합니다.
from kfp.registry import RegistryClient

host = f"http://{REGION}-kfp.pkg.dev/{PROJECT_ID}/{REPO_NAME}"
client = RegistryClient(host=host)
TEMPLATE_NAME, VERSION_NAME = client.upload_pipeline(
file_name=PIPELINE_FILE,
tags=["v1", "latest"],
extra_headers={"description":"This is an example pipeline template."})
TEMPLATE_URI = f"http://{REGION}-kfp.pkg.dev/{PROJECT_ID}/{REPO_NAME}/{TEMPLATE_NAME}/latest"
Google Cloud 콘솔에서 템플릿이 파이프라인 템플릿에 표시되는지 확인합니다.
수동으로 파이프라인 실행
파이프라인이 작동하는지 확인하려면 파이프라인을 수동으로 실행합니다.
노트북에서 파이프라인을 작업으로 실행하는 데 필요한 매개변수를 지정합니다.
DATASET_NAME = "mlops" TABLE_NAME = "chicago" worker_pool_specs = [{ "machine_spec": {"machine_type": "e2-highmem-2"}, "replica_count": 1, "python_package_spec":{ "executor_image_uri": "us-docker.pkg.dev/vertex-ai/training/sklearn-cpu.1-0:latest", "package_uris": [f"{BUCKET_URI}/trainer-0.1.tar.gz"], "python_module": "trainer.task", "args":["--project-id",PROJECT_ID, "--training-dir",f"/gcs/{BUCKET_NAME}","--bq-source",f"{PROJECT_ID}.{DATASET_NAME}.{TABLE_NAME}"] }, }] parameters = { "project": PROJECT_ID, "location": REGION, "training_job_display_name": "taxifare-prediction-training-job", "worker_pool_specs": worker_pool_specs, "base_output_dir": BUCKET_URI, "prediction_container_uri": "us-docker.pkg.dev/vertex-ai/prediction/sklearn-cpu.1-0:latest", "model_display_name": "taxifare-prediction-model", "batch_prediction_job_display_name": "taxifare-prediction-batch-job", "target_field_name": "fare", "test_data_gcs_uri": [f"{BUCKET_URI}/test_no_target.csv"], "ground_truth_gcs_source": [f"{BUCKET_URI}/test.csv"], "batch_predictions_gcs_prefix": f"{BUCKET_URI}/batch_predict_output", "existing_model": False }파이프라인 작업을 만들고 실행합니다.
# Create a pipeline job
job = aiplatform.PipelineJob(
    display_name="triggered_custom_regression_evaluation",
    template_path=TEMPLATE_URI ,
    parameter_values=parameters,
    pipeline_root=BUCKET_URI,
    enable_caching=False
)
# Run the pipeline job
job.run()
작업이 완료되는 데 약 30분이 소요됩니다.
콘솔의 파이프라인 페이지에 새 파이프라인 실행이 표시됩니다.
파이프라인 실행이 완료되면 Vertex AI Model Registry에
taxifare-prediction-model이라는 새 모델이나 새 모델 버전이 표시됩니다.새 일괄 예측 작업도 표시됩니다.
파이프라인을 트리거하는 함수 만들기
이 단계에서는 새 데이터를 BigQuery 테이블에 삽입할 때마다 파이프라인을 실행하는 Cloud 함수(2세대)를 만듭니다.
특히 Eventarc를 사용하여 google.cloud.bigquery.v2.JobService.InsertJob 이벤트가 발생할 때마다 함수를 트리거합니다. 그런 다음 이 함수에서 파이프라인 템플릿을 실행합니다.
자세한 내용은 Eventarc 트리거 및 지원되는 이벤트 유형을 참조하세요.
Eventarc 트리거로 함수 만들기
Google Cloud 콘솔에서 Cloud Functions 페이지로 이동합니다.
함수 만들기 버튼을 클릭합니다. 구성 페이지에서 다음을 수행합니다.
2세대를 환경으로 선택합니다.
함수 이름에 mlops를 사용합니다.
리전에 Cloud Storage 버킷 및 Artifact Registry 저장소와 동일한 리전을 선택합니다.
트리거에 기타 트리거를 선택합니다. Eventarc 트리거 창이 열립니다.
트리거 유형에 Google 소스를 선택합니다.
이벤트 제공자에 BigQuery를 선택합니다.
이벤트 유형에
google.cloud.bigquery.v2.JobService.InsertJob을 선택합니다.리소스에 특정 리소스를 선택하고 BigQuery 테이블을 지정합니다.
projects/PROJECT_ID/datasets/mlops/tables/chicago리전 필드에서 해당하는 경우 Eventarc 트리거 위치를 선택합니다. 자세한 내용은 트리거 위치를 참조하세요.
트리거 저장을 클릭합니다.
서비스 계정에 역할을 부여하라는 메시지가 표시되면 모두 부여를 클릭합니다.
다음을 클릭하여 코드 페이지로 이동합니다. 코드 페이지에서 다음을 수행합니다.
런타임을 Python 3.12로 설정합니다.
진입점을
mlops_entrypoint로 설정합니다.인라인 편집기를 사용하여
main.py파일을 열고 콘텐츠를 다음으로 바꿉니다.PROJECT_ID,REGION,BUCKET_NAME을 이전에 사용한 값으로 바꿉니다.import json import functions_framework import requests import google.auth import google.auth.transport.requests # CloudEvent function to be triggered by an Eventarc Cloud Audit Logging trigger # Note: this is NOT designed for second-party (Cloud Audit Logs -> Pub/Sub) triggers! @functions_framework.cloud_event def mlops_entrypoint(cloudevent): # Print out the CloudEvent's (required) `type` property # See http://github.com/cloudevents/spec/blob/v1.0.1/spec.md#type print(f"Event type: {cloudevent['type']}") # Print out the CloudEvent's (optional) `subject` property # See http://github.com/cloudevents/spec/blob/v1.0.1/spec.md#subject if 'subject' in cloudevent: # CloudEvent objects don't support `get` operations. # Use the `in` operator to verify `subject` is present. print(f"Subject: {cloudevent['subject']}") # Print out details from the `protoPayload` # This field encapsulates a Cloud Audit Logging entry # See http://cloud.go888ogle.com.fqhub.com/logging/docs/audit#audit_log_entry_structure payload = cloudevent.data.get("protoPayload") if payload: print(f"API method: {payload.get('methodName')}") print(f"Resource name: {payload.get('resourceName')}") print(f"Principal: {payload.get('authenticationInfo', dict()).get('principalEmail')}") row_count = payload.get('metadata', dict()).get('tableDataChange',dict()).get('insertedRowsCount') print(f"No. of rows: {row_count} !!") if row_count: if int(row_count) > 0: print ("Pipeline trigger Condition met !!") submit_pipeline_job() else: print ("No pipeline triggered !!!") def submit_pipeline_job(): PROJECT_ID = 'PROJECT_ID' REGION = 'REGION' BUCKET_NAME = "BUCKET_NAME" DATASET_NAME = "mlops" TABLE_NAME = "chicago" base_output_dir = BUCKET_NAME BUCKET_URI = "gs://{}".format(BUCKET_NAME) PIPELINE_ROOT = "{}/pipeline_root/chicago-taxi-pipe".format(BUCKET_URI) PIPELINE_NAME = "vertex-mlops-pipeline-tutorial" EXPERIMENT_NAME = PIPELINE_NAME + "-experiment" REPO_NAME ="mlops" TEMPLATE_NAME="custom-model-training-evaluation-pipeline" TRAINING_JOB_DISPLAY_NAME="taxifare-prediction-training-job" worker_pool_specs = [{ "machine_spec": {"machine_type": "e2-highmem-2"}, "replica_count": 1, "python_package_spec":{ "executor_image_uri": "us-docker.pkg.dev/vertex-ai/training/sklearn-cpu.1-0:latest", "package_uris": [f"{BUCKET_URI}/trainer-0.1.tar.gz"], "python_module": "trainer.task", "args":["--project-id",PROJECT_ID,"--training-dir",f"/gcs/{BUCKET_NAME}","--bq-source",f"{PROJECT_ID}.{DATASET_NAME}.{TABLE_NAME}"] }, }] parameters = { "project": PROJECT_ID, "location": REGION, "training_job_display_name": "taxifare-prediction-training-job", "worker_pool_specs": worker_pool_specs, "base_output_dir": BUCKET_URI, "prediction_container_uri": "us-docker.pkg.dev/vertex-ai/prediction/sklearn-cpu.1-0:latest", "model_display_name": "taxifare-prediction-model", "batch_prediction_job_display_name": "taxifare-prediction-batch-job", "target_field_name": "fare", "test_data_gcs_uri": [f"{BUCKET_URI}/test_no_target.csv"], "ground_truth_gcs_source": [f"{BUCKET_URI}/test.csv"], "batch_predictions_gcs_prefix": f"{BUCKET_URI}/batch_predict_output", "existing_model": False } TEMPLATE_URI = f"http://{REGION}-kfp.pkg.dev/{PROJECT_ID}/{REPO_NAME}/{TEMPLATE_NAME}/latest" print("TEMPLATE URI: ", TEMPLATE_URI) request_body = { "name": PIPELINE_NAME, "displayName": PIPELINE_NAME, "runtimeConfig":{ "gcsOutputDirectory": PIPELINE_ROOT, "parameterValues": parameters, }, "templateUri": TEMPLATE_URI } pipeline_url = "http://us-central1-aiplatform.googleapis.com/v1/projects/{}/locations/{}/pipelineJobs".format(PROJECT_ID, REGION) creds, project = google.auth.default() auth_req = google.auth.transport.requests.Request() creds.refresh(auth_req) headers = { 'Authorization': 'Bearer {}'.format(creds.token), 'Content-Type': 'application/json; charset=utf-8' } response = requests.request("POST", pipeline_url, headers=headers, data=json.dumps(request_body)) print(response.text)requirements.txt파일을 열고 콘텐츠를 다음으로 바꿉니다.requests==2.31.0 google-auth==2.25.1
배포를 클릭하여 함수를 배포합니다.
데이터를 삽입하여 파이프라인 트리거
Google Cloud 콘솔에서 BigQuery Studio로 이동합니다.
SQL 쿼리 만들기를 클릭하고 실행을 클릭하여 다음 SQL 쿼리를 실행합니다.
INSERT INTO `PROJECT_ID.mlops.chicago`
(
    WITH
      taxitrips AS (
      SELECT
        trip_start_timestamp,
        trip_end_timestamp,
        trip_seconds,
        trip_miles,
        payment_type,
        pickup_longitude,
        pickup_latitude,
        dropoff_longitude,
        dropoff_latitude,
        tips,
        tolls,
        fare,
        pickup_community_area,
        dropoff_community_area,
        company,
        unique_key
      FROM
        `bigquery-public-data.chicago_taxi_trips.taxi_trips`
      WHERE pickup_longitude IS NOT NULL
      AND pickup_latitude IS NOT NULL
      AND dropoff_longitude IS NOT NULL
      AND dropoff_latitude IS NOT NULL
      AND trip_miles > 0
      AND trip_seconds > 0
      AND fare > 0
      AND EXTRACT(YEAR FROM trip_start_timestamp) = 2022
    )

    SELECT
      trip_start_timestamp,
      EXTRACT(MONTH from trip_start_timestamp) as trip_month,
      EXTRACT(DAY from trip_start_timestamp) as trip_day,
      EXTRACT(DAYOFWEEK from trip_start_timestamp) as trip_day_of_week,
      EXTRACT(HOUR from trip_start_timestamp) as trip_hour,
      trip_seconds,
      trip_miles,
      payment_type,
      ST_AsText(
          ST_SnapToGrid(ST_GeogPoint(pickup_longitude, pickup_latitude), 0.1)
      ) AS pickup_grid,
      ST_AsText(
          ST_SnapToGrid(ST_GeogPoint(dropoff_longitude, dropoff_latitude), 0.1)
      ) AS dropoff_grid,
      ST_Distance(
          ST_GeogPoint(pickup_longitude, pickup_latitude),
          ST_GeogPoint(dropoff_longitude, dropoff_latitude)
      ) AS euclidean,
      CONCAT(
          ST_AsText(ST_SnapToGrid(ST_GeogPoint(pickup_longitude,
              pickup_latitude), 0.1)),
          ST_AsText(ST_SnapToGrid(ST_GeogPoint(dropoff_longitude,
              dropoff_latitude), 0.1))
      ) AS loc_cross,
      IF((tips/fare >= 0.2), 1, 0) AS tip_bin,
      tips,
      tolls,
      fare,
      pickup_longitude,
      pickup_latitude,
      dropoff_longitude,
      dropoff_latitude,
      pickup_community_area,
      dropoff_community_area,
      company,
      unique_key,
      trip_end_timestamp
    FROM
      taxitrips
    LIMIT 1000000
)
이 SQL 쿼리는 테이블에 새 행을 삽입합니다.
이벤트가 트리거되었는지 확인하려면 함수 로그에서
pipeline trigger condition met을 검색합니다.함수가 성공적으로 트리거되면 Vertex AI Pipelines에서 새 파이프라인이 실행됩니다. 파이프라인 작업이 완료되는 데 약 30분이 소요됩니다.
삭제
이 프로젝트에 사용된 모든 Google Cloud 리소스를 삭제하려면 이 튜토리얼에 사용한 Google Cloud 프로젝트를 삭제하면 됩니다.
또는 이 튜토리얼에서 만든 리소스를 개별적으로 삭제할 수 있습니다.
Vertex AI에서 리소스를 삭제합니다.
Vertex AI Model Registry에서 모델을 삭제합니다.
다른 Vertex AI 리소스는 이전에 실행된 작업의 레코드뿐입니다.
파이프라인 실행을 삭제합니다.
커스텀 학습 작업을 삭제합니다.
일괄 예측 작업을 삭제합니다.